
Force24 Exporter
Version 0.0.0
Check out the API docs here for more information.
Overview
The Force24 Exporter lets you upsert Contacts and related custom fields from your warehouse into Force24. It accepts a recordset (email, externalId, and a JSON “fields” payload) and maps those into Force24’s contact model and custom fields.
Setup
You’ll need:
Force24 API credentials (with permission to upsert contacts & fields)
A Snowflake table or view exposing the schema required by the exporter (see Contacts report below)
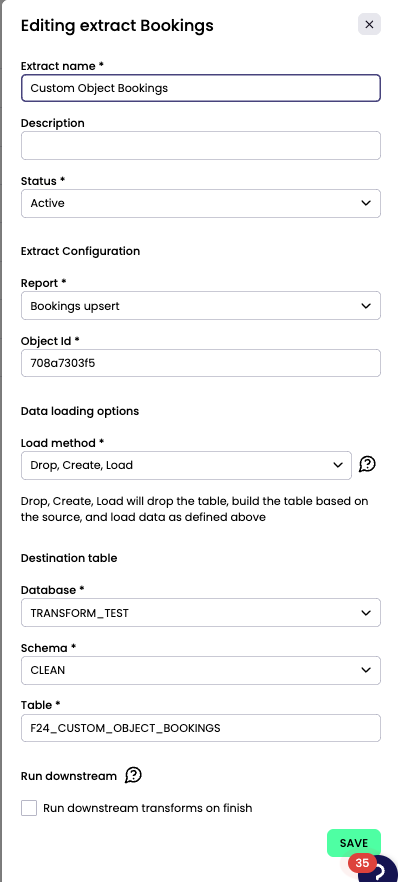
Create the source in Kleene → Sources → Add Source → Force24 Exporter, then add extracts for each object you intend to upsert.
Reports detail
| ⬇️ Report | 📄 Link to API endpoint |
|---|---|
| Contacts | Contacts Upsert |
| Custom Objects | Custom Objects |
Contacts report
- Create the staging table
Create a Snowflake table that the exporter will read from. It must expose exactly these columns:
CREATE OR REPLACE TABLE "TRANSFORM"."CLEAN"."F24_CONTACTS_MAPPED" (
  "email"       VARCHAR,
  "externalId"  VARCHAR,
  "fields"      VARIANT
);
email → contact’s primary email in Force24
externalId → your stable business key for this contact (e.g., client ref)
fields → JSON object of additional attributes (Force24 standard fields + custom field IDs)
- Populate the table from your mastered contacts
All non-core columns should be placed into fields as key/value pairs. Use Force24’s field names/IDs as keys. Your provided transform:
(You must replace the column names and fields ids with your own, Check: How to retrieve Contact fields
INSERT INTO "TRANSFORM_TEST"."CLEAN"."F24_CONTACTS_MAPPED" ("email", "externalId", "fields")
SELECT
  EMAIL,
  CLIENT_REF,
  OBJECT_CONSTRUCT_KEEP_NULL(
    'firstname',      FIRST_NAME,
    'lastname',       LAST_NAME,
    'salutation',     TITLE,
    'emailaddress',   EMAIL,
    'address1line1',  ADD1,
    'address1line2',  ADD2,
    'address1line3',  ADD3,
    'address1country', CLEANED_COUNTRY,
    'address1postcode', POSTCODE,

    -- dates in DD/MM/YYYY format
    'birthdate',      TO_VARCHAR(TRY_TO_DATE(DOB), 'DD/MM/YYYY'),

    '8d3uxg7v6s',     GENDER,
    '2xcqs6rtez',     FIRST_CLS_BOOKING,
    '6wdahpb385',     FIRST_STI_BOOKING,
    'szfycvtx6q',     RECENT_CLS_BOOKING,
    'p8h5bxzd6w',     RECENT_STI_BOOKING,
    'me3xp6hwrb',     TRY_TO_NUMBER(MAJOR_COUNT),
    'qsr9du74fj',     TRY_TO_NUMBER(SUPERHALF_COUNT),
    'm62d3sjhta',     TRY_TO_NUMBER(TOTAL_CLS_BOOKINGS),
    'qs5m6cr7wx',     TRY_TO_NUMBER(TOTAL_STI_BOOKINGS),
    'nva2sj97bc',     TRY_TO_DOUBLE(TOTAL_CLS_REVENUE),
    'casuv78ztd',     TRY_TO_DOUBLE(TOTAL_STI_REVENUE)
  ) AS "fields"
FROM "TRANSFORM_TEST"."KLEENE_FILEINGEST"."F24_CONTACTS";
Here is how the end table should look like ready for export:
| externalId | fields | |
|---|---|---|
| [email protected] | 28765ABC | {"name":"David", "addressline1":"example address", "a7583bdc5a": "David", "ed1881ed2e": "/22/01/1990"} |
- Configure the extract in Kleene
When you add an extract for Force24 Contacts:
Source: your Force24 Exporter source
Report: Contacts
Table: point to the newly created table in the previous step.
Required text parameter: fields (Check: How to retrieve Contact fields)
In the extract form, you must include a text field parameter named fields.

Behaviour of exporter (and additional table for logging)
- If your data contains a column that you expect to upsert, you must supply the matching Force24 field key in fields during extract setup.
- Whenever you run the report, the connector will store the requests in a table in the same schema with the same name as the destination table + "_REPONSES".
- If a contact is already upserted with the same
externalIdthat will only be updated with the fields supplied.
ImportantIf your table contains a column that you expect to upsert, you must supply the matching Force24 field key in fields column in step 2.
Custom Objects Upsert
Force24 custom objects (like Bookings) are upserted after Contacts. Each custom object row must reference a Force24 contactId and an externalId (your stable object key). All remaining attributes go in a JSON fields object using Force24 custom field IDs as keys.
PrerequisiteContacts must already be upserted successfully as the contactId will be required for each custom object to associate with.
- Create Table with CONTACT_ID
We first clone the source into a new table with an extra column CONTACT_ID.
CREATE OR REPLACE TABLE TRANSFORM.CLEAN.F24_CUSTOM_OBJECTS_CONTACTS AS
SELECT
    t.*,
    NULL AS CONTACT_ID
FROM TRANSFORM_TEST.CLEAN.F24_CUSTOM_OBJECTS t;
- Populate CONTACT_ID
For all the Custom objects populate it's contactId for which the custom object needs to be associated with.
- Create Force24 Mapping Table
Finally, we build the table required for Force24 custom object sync.
This maps booking fields to Force24 field IDs in a JSON object.
(You must replace the column names and fields ids with your own, Check: How to retrieve Custom Object fields)
CREATE OR REPLACE TABLE F24_CUSTOM_OBJECTS_CONTACTS_MAPPED AS
SELECT
    BOOKING_REF  AS externalId,
    CONTACT_ID   AS contactId,
    OBJECT_CONSTRUCT_KEEP_NULL(
        'a7583bdc5a', BOOKING_REF,
        '3f7a62c092', TO_CHAR(TRY_TO_DATE(BOOKED_DATE), 'DD/MM/YYYY'),
        'b8aa67ab6f', TO_CHAR(TRY_TO_DATE(DEPARTURE_DATE), 'DD/MM/YYYY'),
        '2eacf25480', TO_CHAR(TRY_TO_DATE(RETURN_DATE),   'DD/MM/YYYY'),
        '89952c4154', BOOKING_STATUS,
        '01aa13f42f', BOOKING_CHANNEL,
        'd69d6042d3', TRY_TO_NUMBER(TOTAL_REVENUE),
        'ed1881ed2e', YEAR,
        '35a2027361', TRY_TO_NUMBER(ADULTS),
        '4e43b07f91', TRY_TO_NUMBER(CHILDREN),
        'c16e963bbe', TERRITORY,
        '1ccfd8a0d3', BUSINESS_AREA,
        '1dd619c082', RACE,
        '5aeeb55ea3', IS_MAJOR_OR_SUPERHALF
    ) AS fields
FROM TRANSFORM_TEST.CLEAN.F24_CUSTOM_OBJECTS_CONTACTS;
Output table has:
externalIdcontactId(Force24 contact id)fields(JSON with all fields mappings)
Here is how the end table should look like ready for export:
| externalId | contactId | fields |
|---|---|---|
| 1234ABC | 28765 | {"name":"David", "addressline1":"example address", "a7583bdc5a": "David", "ed1881ed2e": "/22/01/1990"} |
Now in the above example, the table F24_CUSTOM_OBJECTS_CONTACTS_MAPPED is ready for export.
For Custom objects:
Replace the field mappings ('3f7a62c092', '89952c4154', etc.) with the Force24 field keys relevant to their object.
Replace the source columns (BOOKED_DATE, BOOKING_STATUS, etc.) with your schema.
- Configure the extract in Kleene
When you add an extract for Force24 Contacts:
Source: your Force24 Exporter source
Report: Custom Object
Table: point to the newly created table in the previous step.
Object Id: Your custom Object Id (Check : How to retrieve Custom Object Id)
In the extract form, you must include a text field parameter named fields.
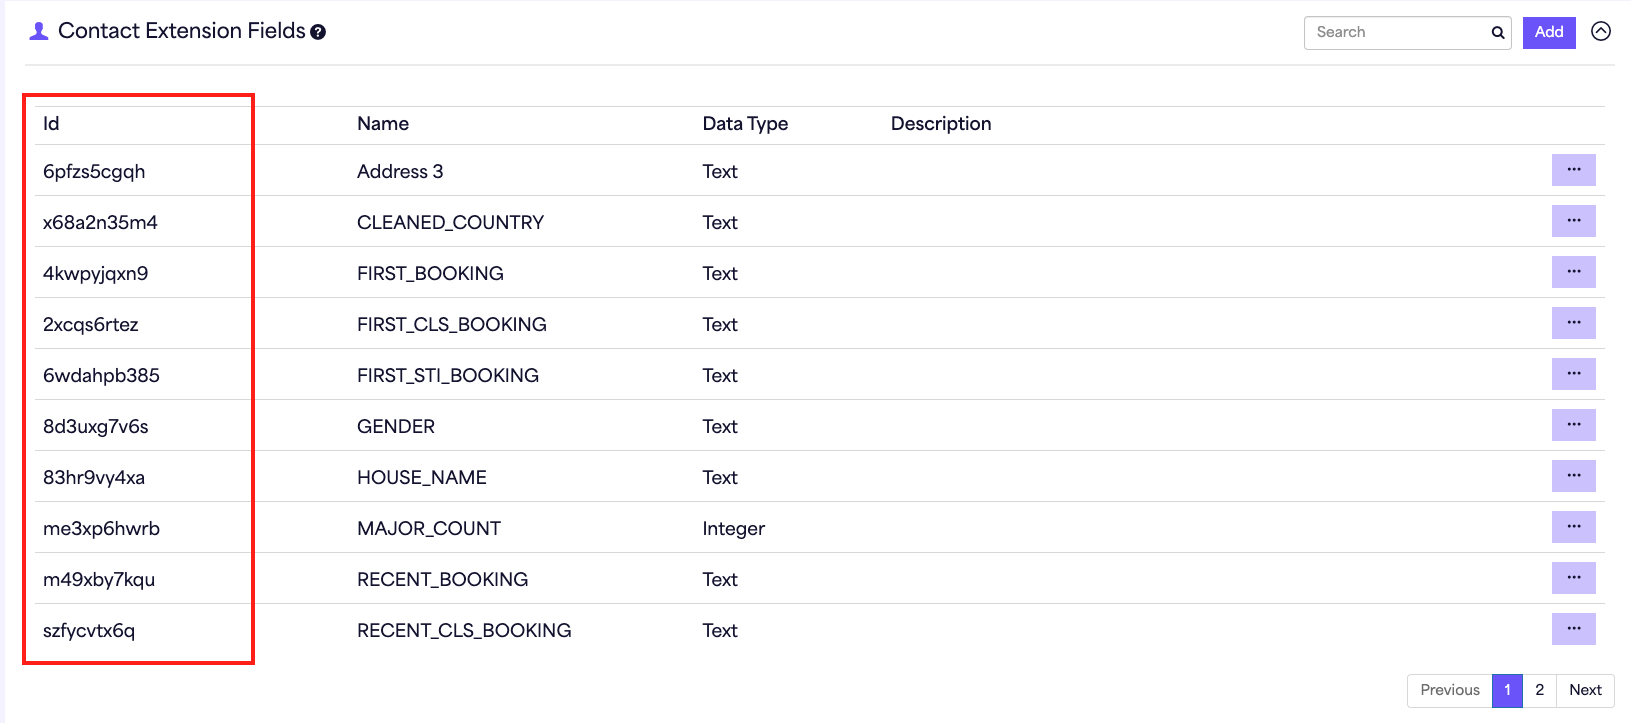
How to find fields for contact
- Login to your F24 dashboard.
- Go to Account Settings.
- Click on Contact Extension Fields
- The Id's are the names to be used for fields:
How to retrieve Custom Object Id
- Login to your F24 dashboard.
- Go to Account Settings.
- Click on Custom Objects

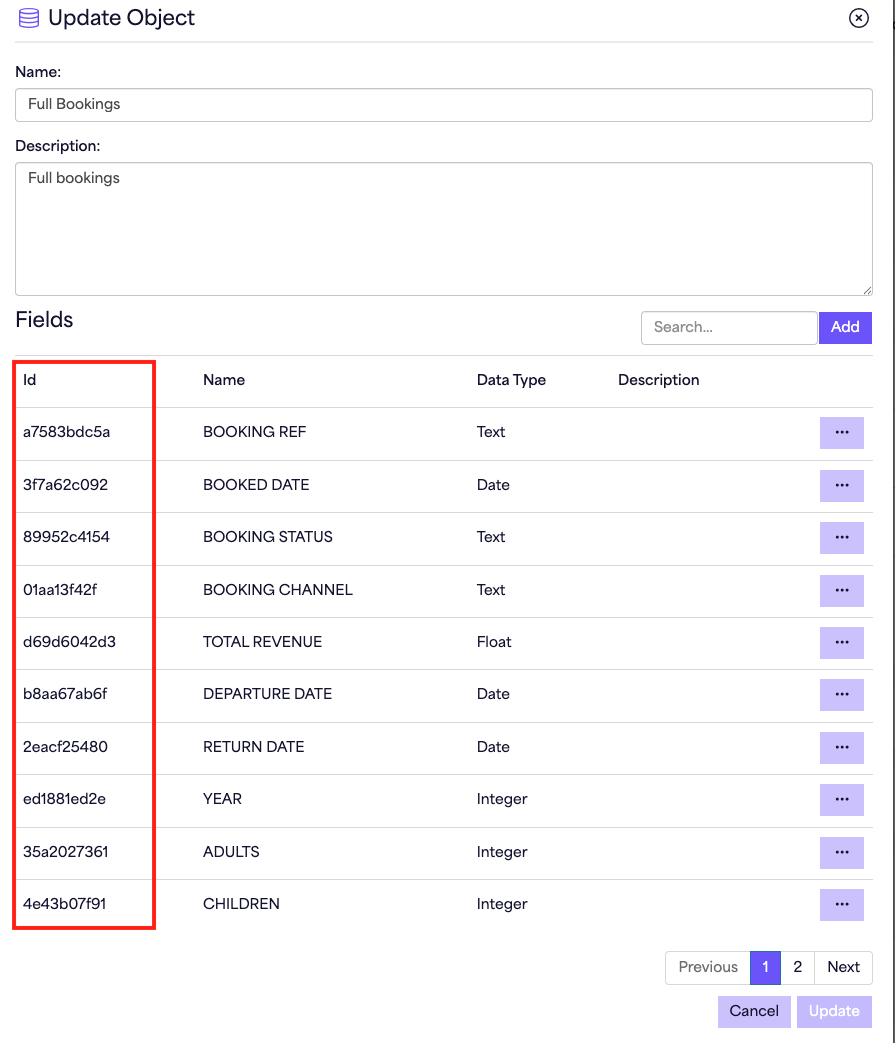
How to find fields for Custom Objects
- Login to your F24 dashboard.
- Go to Account Settings.
- Click on Custom Objects
- Click on the three dots infront of your Custom Object.
- The Id's are the names to be used for fields:
Limitations
Connector will change data within Force24Use of the report on this connector will result in changes to the data within your Force24 system. We advise having backup of the data, in case you want to revert back.
Our suggestion is also to experiment and explore the behaviour of the connector and the API, by first spending sufficient time testing things with dummy data on a Sandbox environment before making any attempts to go to Production changes.
Custom ObjectsA custom object must be associated with a contact in F24. For a custom object, there must be a matching email in the contacts so that the corresponding Contact ID can be mapped.
Fields MappingWhen mapping a table to a JSON key–value pair inside the fields column, the keys must correspond to valid field identifiers that have been created in the F24 portal.
Updated 8 months ago