
Virtual Data Environments
This is an optional feature in Kleene that can be enabled on a per account basis
Intro
Each Kleene customer now has the ability to set up two Development environments ("Dev"), which lets analysts work safely away from the Production environment ("Prod"), test changes to pipelines before merging those changes back to Prod, with the confidence that they won’t break anything.
It will enable you to -
- Set up and remove two Dev environments, which contains a copy of Prod transforms
- Copy in solely the data required to run the transforms (to avoid excessive costs)
- Edit and run transforms/groups directly with a redesigned SQL console
- Merge into Prod after manually diffing (checking the changes between Dev and Prod)
Important points to note
In the Kleene paradigm, an Environment can be thought of as a branch in the traditional version control set up. We expect users to create and destroy them frequently, every few days to a few weeks, so Dev does not diverge from Prod too much and diffing (resolving the changes between Dev and Prod) becomes too hard.
Currently, there is not physical restriction to editing transforms in Prod. This means that, if you see fit, you should enforce use of Dev internally within your team via governance processes. You can of course see edits to transforms in the logs if, for example a change is made directly to Prod that causes a pipeline breakage.
All the data copied into Dev is stored in a dedicated schema in the default database (see below) and the SQL table references are updated automatically at merge time.
The Transforms page
The Prod and Dev views are accessed from the same page and look very similar, the only differences being that in Prod you'll see the schedules beside each transform, as Dev transforms cannot be scheduled and that the Search functionality is disabled in Dev.
Groups (collections of transforms) and the SQL transforms themselves are front and centre. It's easy to create a new group or transform, or to sort by name or date for example to find a transform.
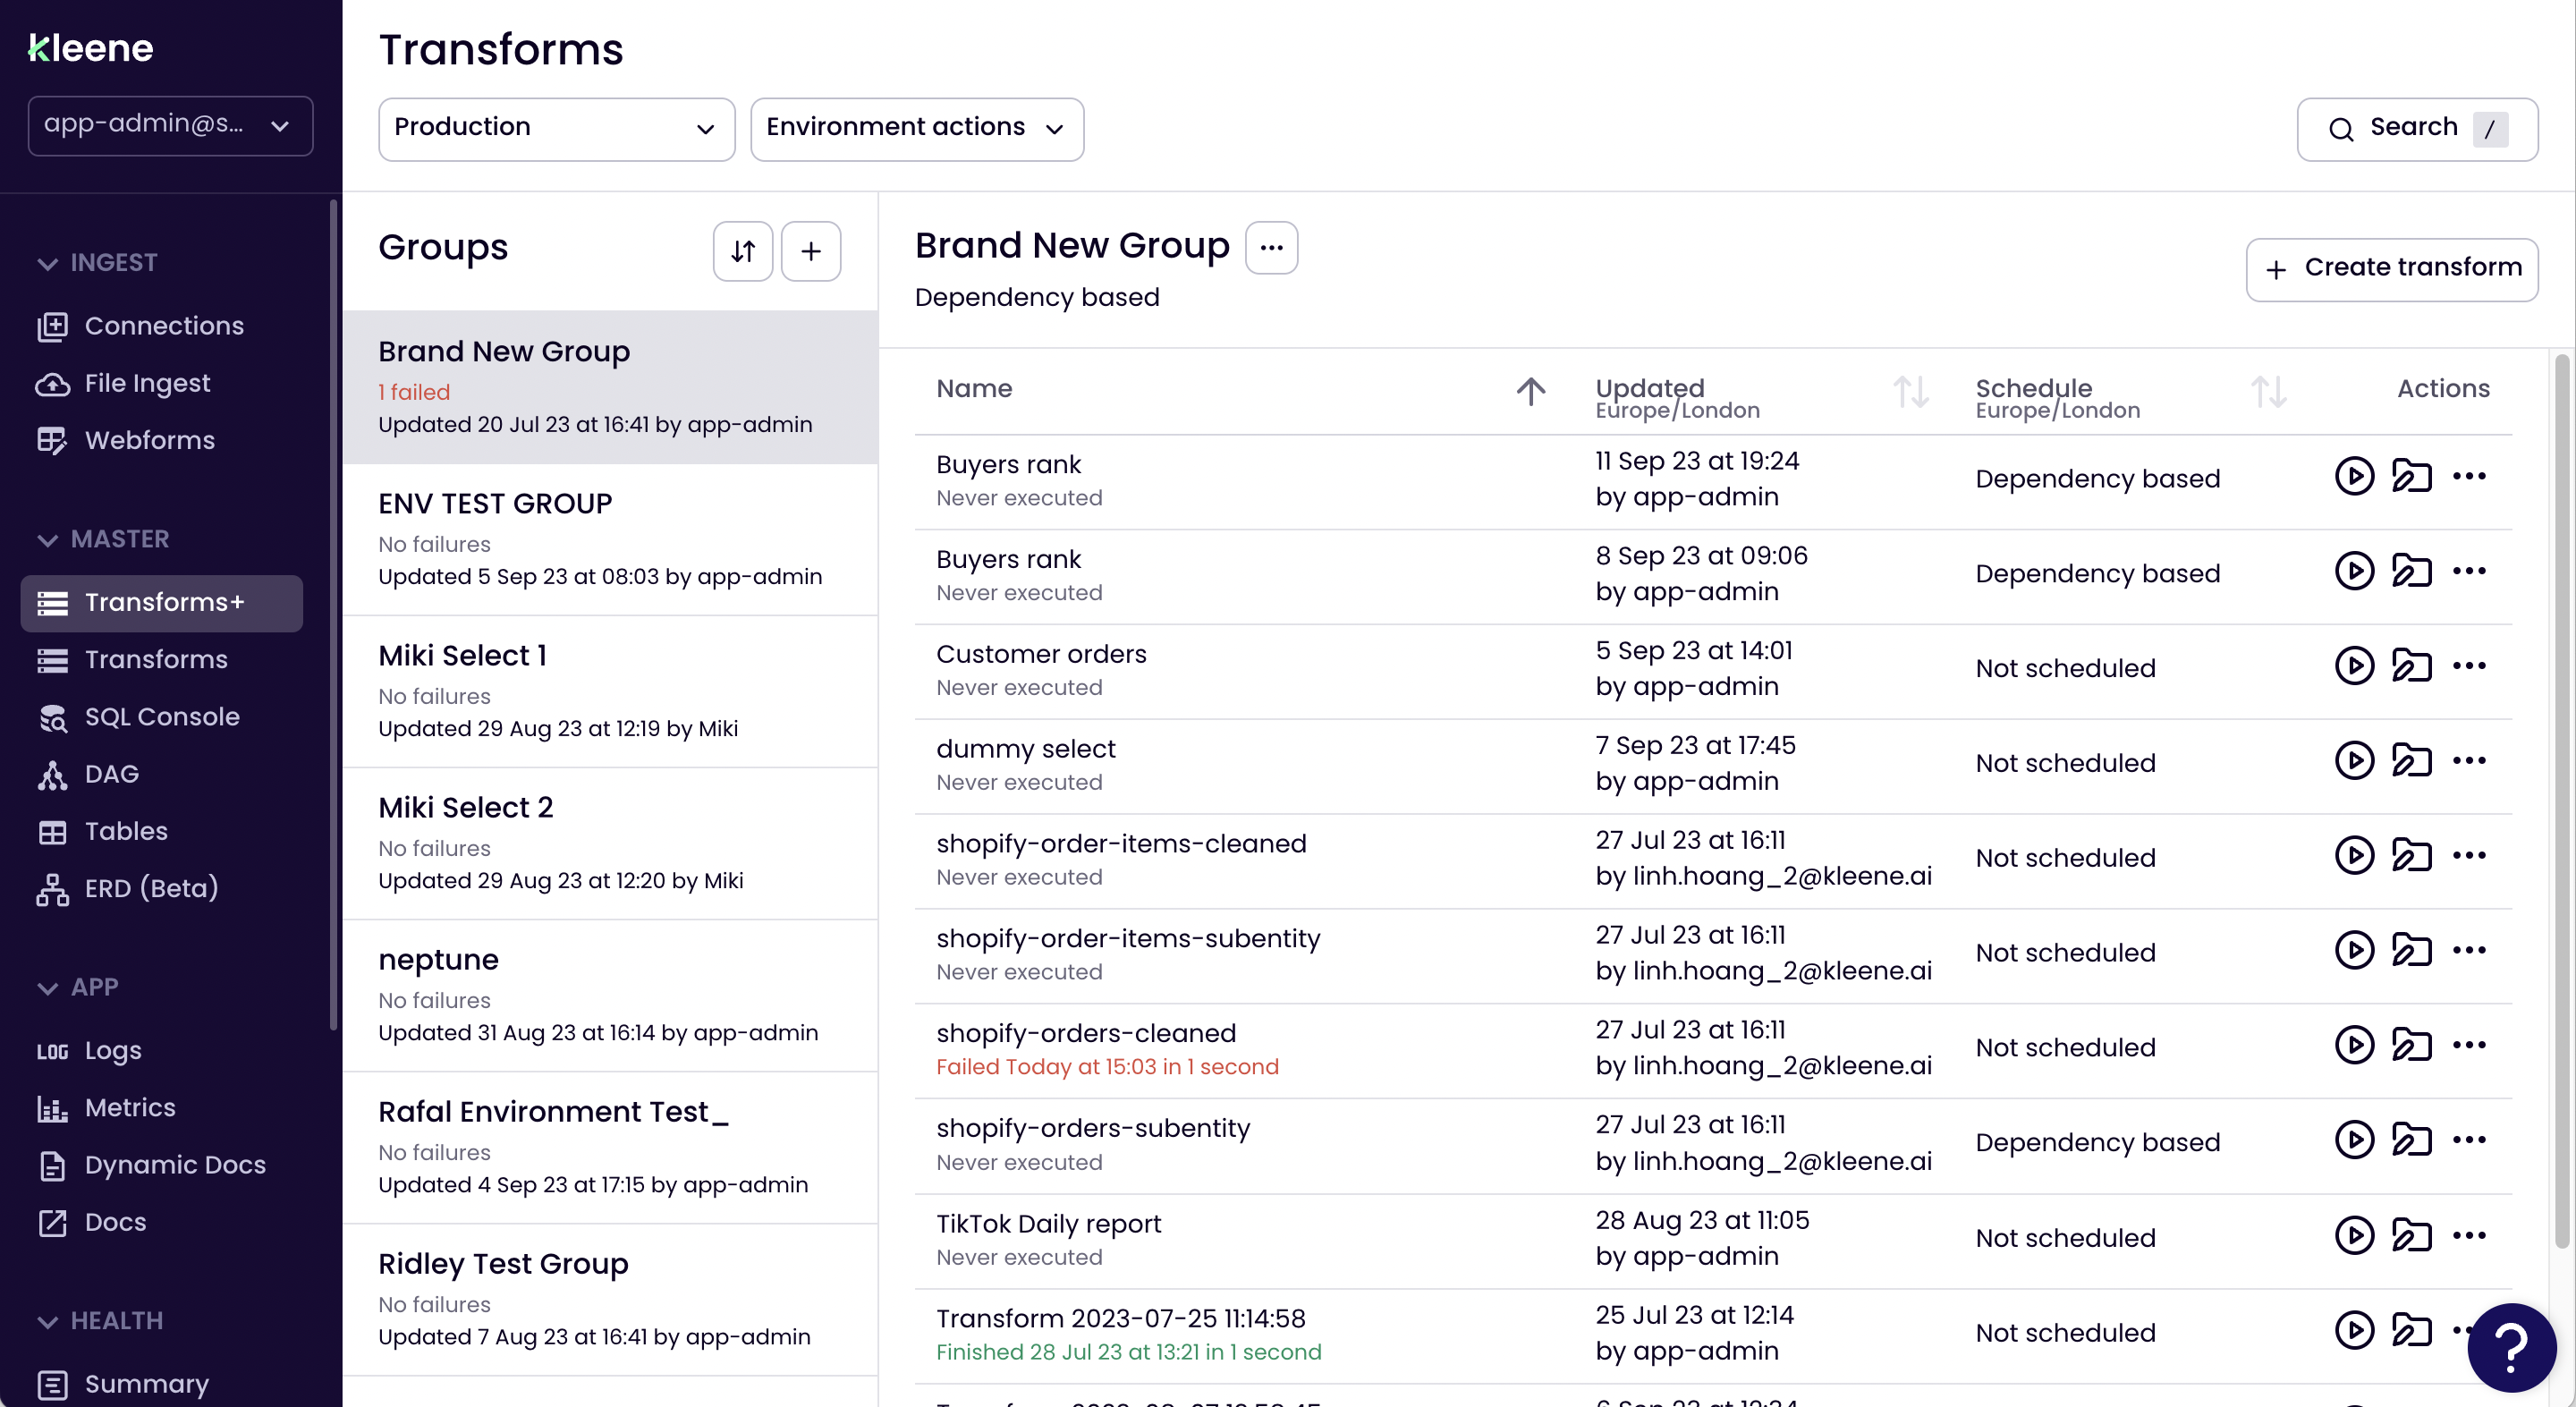
Prod view
From here you see the last run status of transforms, when they were last edited,
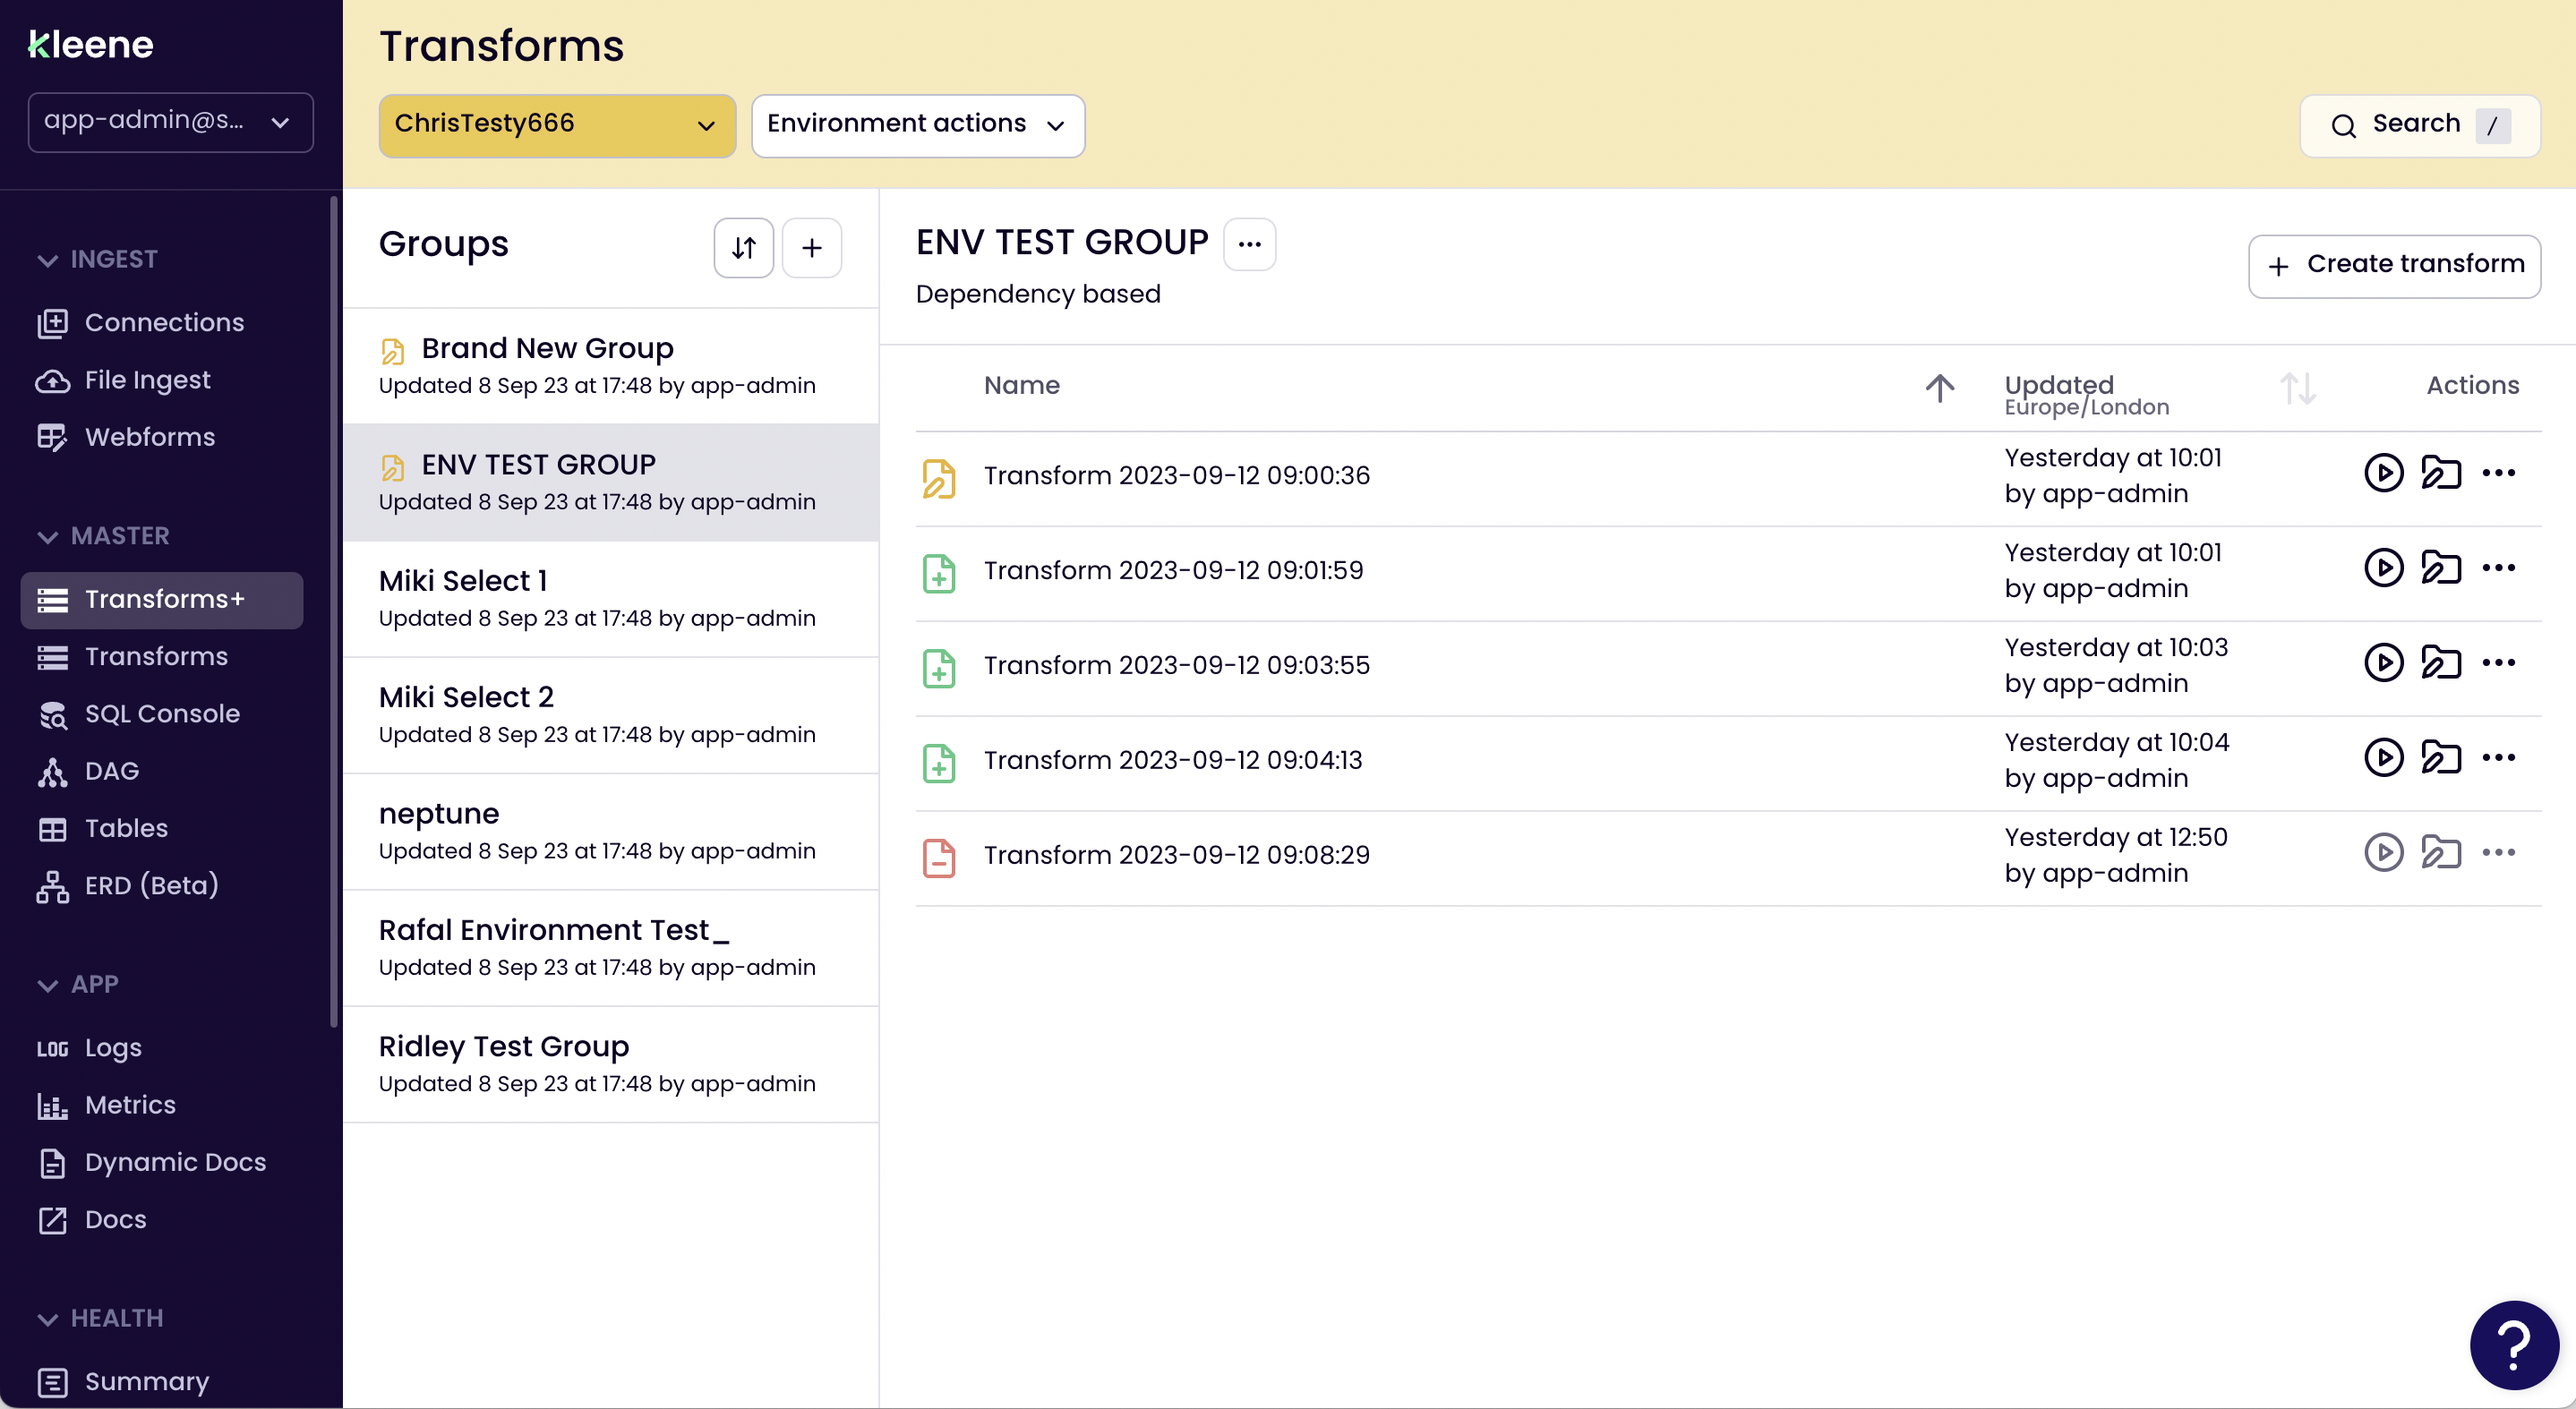
Dev view
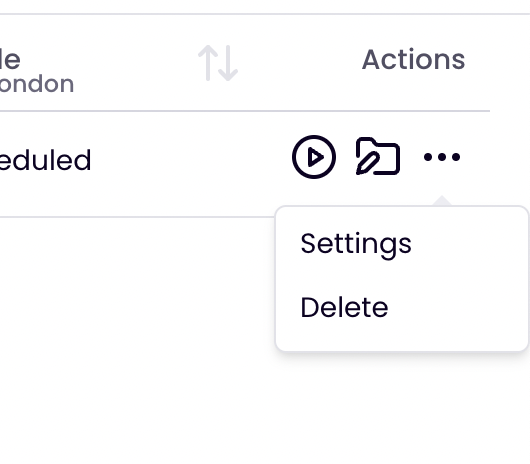
The icons in front of each transform show it's status -
- No Icon: This version is identical to Prod
- Yellow: This transform has been edited in this version of Dev
- Green: This transform is new
- Red: This transform has been selected to be deleted in Prod
You can of course still delete transforms directly from Prod
Setting up the virtual environment
When first used or after the previous Dev environment has been deleted, you'll need to create a new one by selecting Environment actions > Create environment
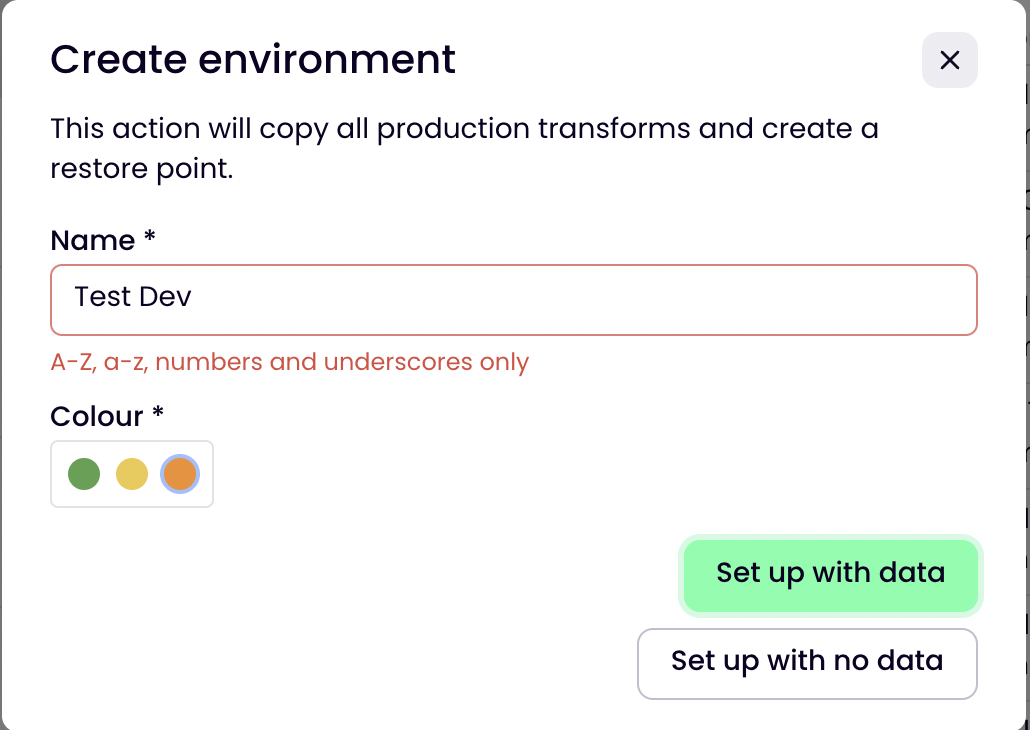
Then add a SQL compliant Name (A-Z, a-z, numbers and underscores) and choose a colour.
You then have two options, go straight to the data copy window or to just copy the Prod transforms.
No data is automatically copied into DevYour transforms will error when you try and run them if you fail to take this step.
Copying data to the environment
To save on data costs, you can copy in only the data needed to run whichever transforms you plan on working with.
What data to copy?We advise users to copy only the input tables of the transforms they are going to edit.
There is no need to copy input tables of downstream transforms where the input table is created/updated by an upstream transform you are planning to execute within the dev environment prior to editing the downstream transform. This is because the table will be created within the dev environment upon execution of the upstream transform.
If the table you are copying is very large please use the SQL console to only copy a subset of the data. See instructions in the section 'Copy Data Using SQL' below.
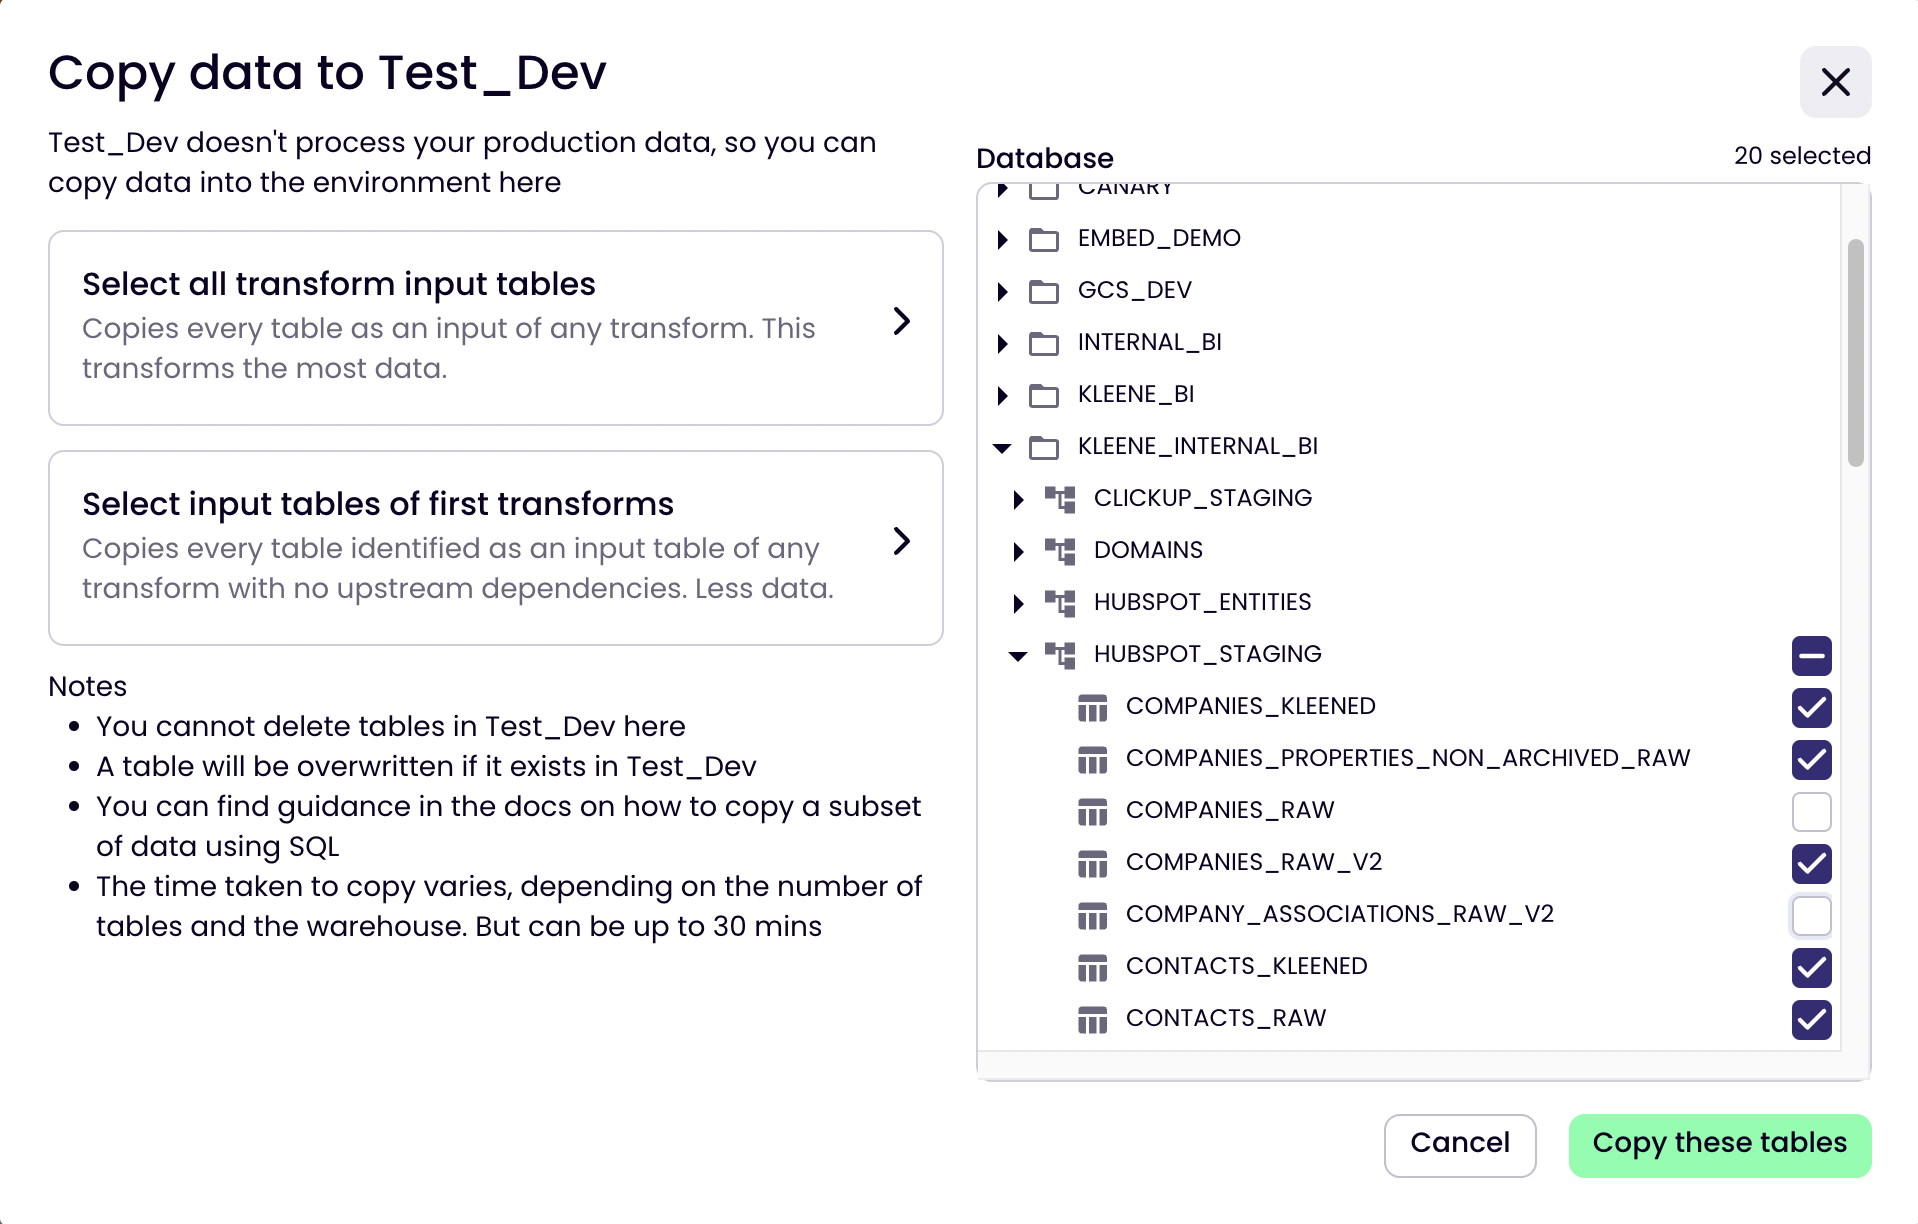
Copy data window
Select Environment actions > Copy data to access the window.
You have three options to move data -
- Select the tables by hand in the database structure
- Click Select all transform input tables
- Click Select input table of first transforms
As per the descriptions, these will automatically parse the SQL in all the transforms and select the tables required to run all transforms or just the first transform in a pipeline.
Then click Copy these tables to start the copying procedure.
The time taken to copy all the tables selected depends on many factors, including how many you chose, the size of the tables, the warehouse etc, but in modern warehouses should not be more that 30mins. You will need to monitor its progress either in the warehouse directly or via the SQL console, remember to refresh the view to see the tables.
Copy data using SQL
As an alternative to using the copy table modal it is also possible to copy data into the dev environment using SQL.
To reduce compute costs and save time it is possible to only copy a subset of the data within a table to the dev schema instead of the whole table when using SQL.
Tables within the dev environment sit within a schema named after the environment. Below are a set of examples of the SQL to use to copy a table/a subset of a table called clean_shopify.orders_cleaned into the dev schema within a Snowflake/Redshift Warehouse:
--Copying a table in a Snowflake warehouse
CREATE OR REPLACE TABLE test_dev.clean_shopify_orders_cleaned CLONE clean_shopify.orders_cleaned;

--Copying a subset of a table in a Snowflake warehouse (only rows where the order was  created in the last seven days)
CREATE OR REPLACE TABLE test_dev.clean_shopify_orders_cleaned LIKE clean_shopify.orders_cleaned;
INSERT INTO test_dev.clean_shopify_orders_cleaned
AS
SELECT * FROM clean_shopify.orders_cleaned
WHERE created_at >= DATEADD('days', 7, CURRENT_TIMESTAMP());

--Copying a table in a Redshift warehouse
DROP TABLE IS EXISTS test_dev.clean_shopify_orders_cleaned;
CREATE TABLE test_dev.clean_shopify_orders_cleaned (LIKE clean_shopify.orders_cleaned);
INSERT INTO test_dev.clean_shopify_orders_cleaned
AS
SELECT * FROM clean_shopify.orders_cleaned;

--Copying a subset of a table in a Redshift warehouse (only rows where the order was  created in the last seven days)
DROP TABLE IS EXISTS test_dev.clean_shopify_orders_cleaned;
CREATE TABLE test_dev.clean_shopify_orders_cleaned (LIKE clean_shopify.orders_cleaned);
INSERT INTO test_dev.clean_shopify_orders_cleaned
AS
SELECT * FROM clean_shopify.orders_cleaned
WHERE created_at >= DATEADD('days', 7, CURRENT_TIMESTAMP());
Refreshing the tables
You can refresh the data in Dev by performing the same procedure and overwriting the tables.
The Dev Schema
The data is then copied into a special schema, named the same as the Dev environment, inside the default database of Kleene.
Dev Schema pathWarehouse > Default DB > Dev Schema > Tables
For example, if in your Snowflake connection you choose TRANSFORM_TEST as your default database and TEST_DEV is your Dev name, then you will find all the copied tables here -
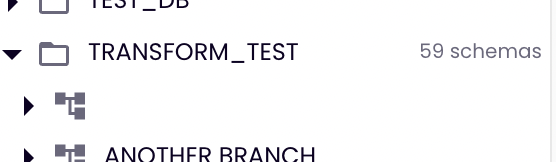

TRANSFORM_TEST.TEST_DEV.CLEAN_SHOPIFY_ORDERS_CLEANED
Managing groups and group schedules
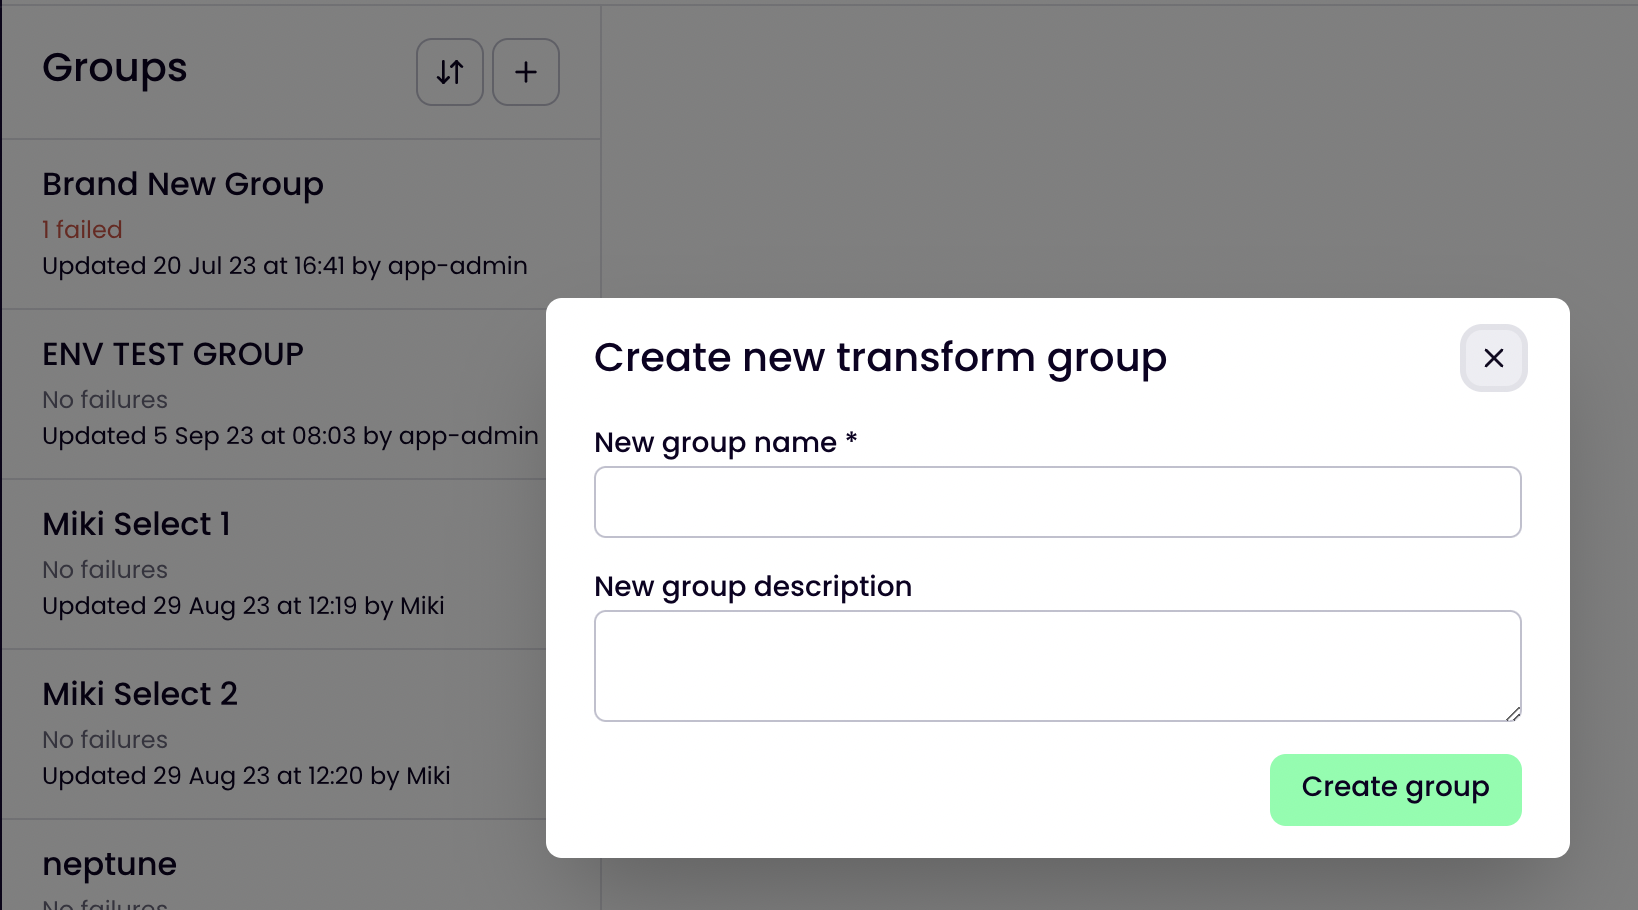
If you need to create a new group, first click the + icon in Prod, name the group, add a description, and submit.
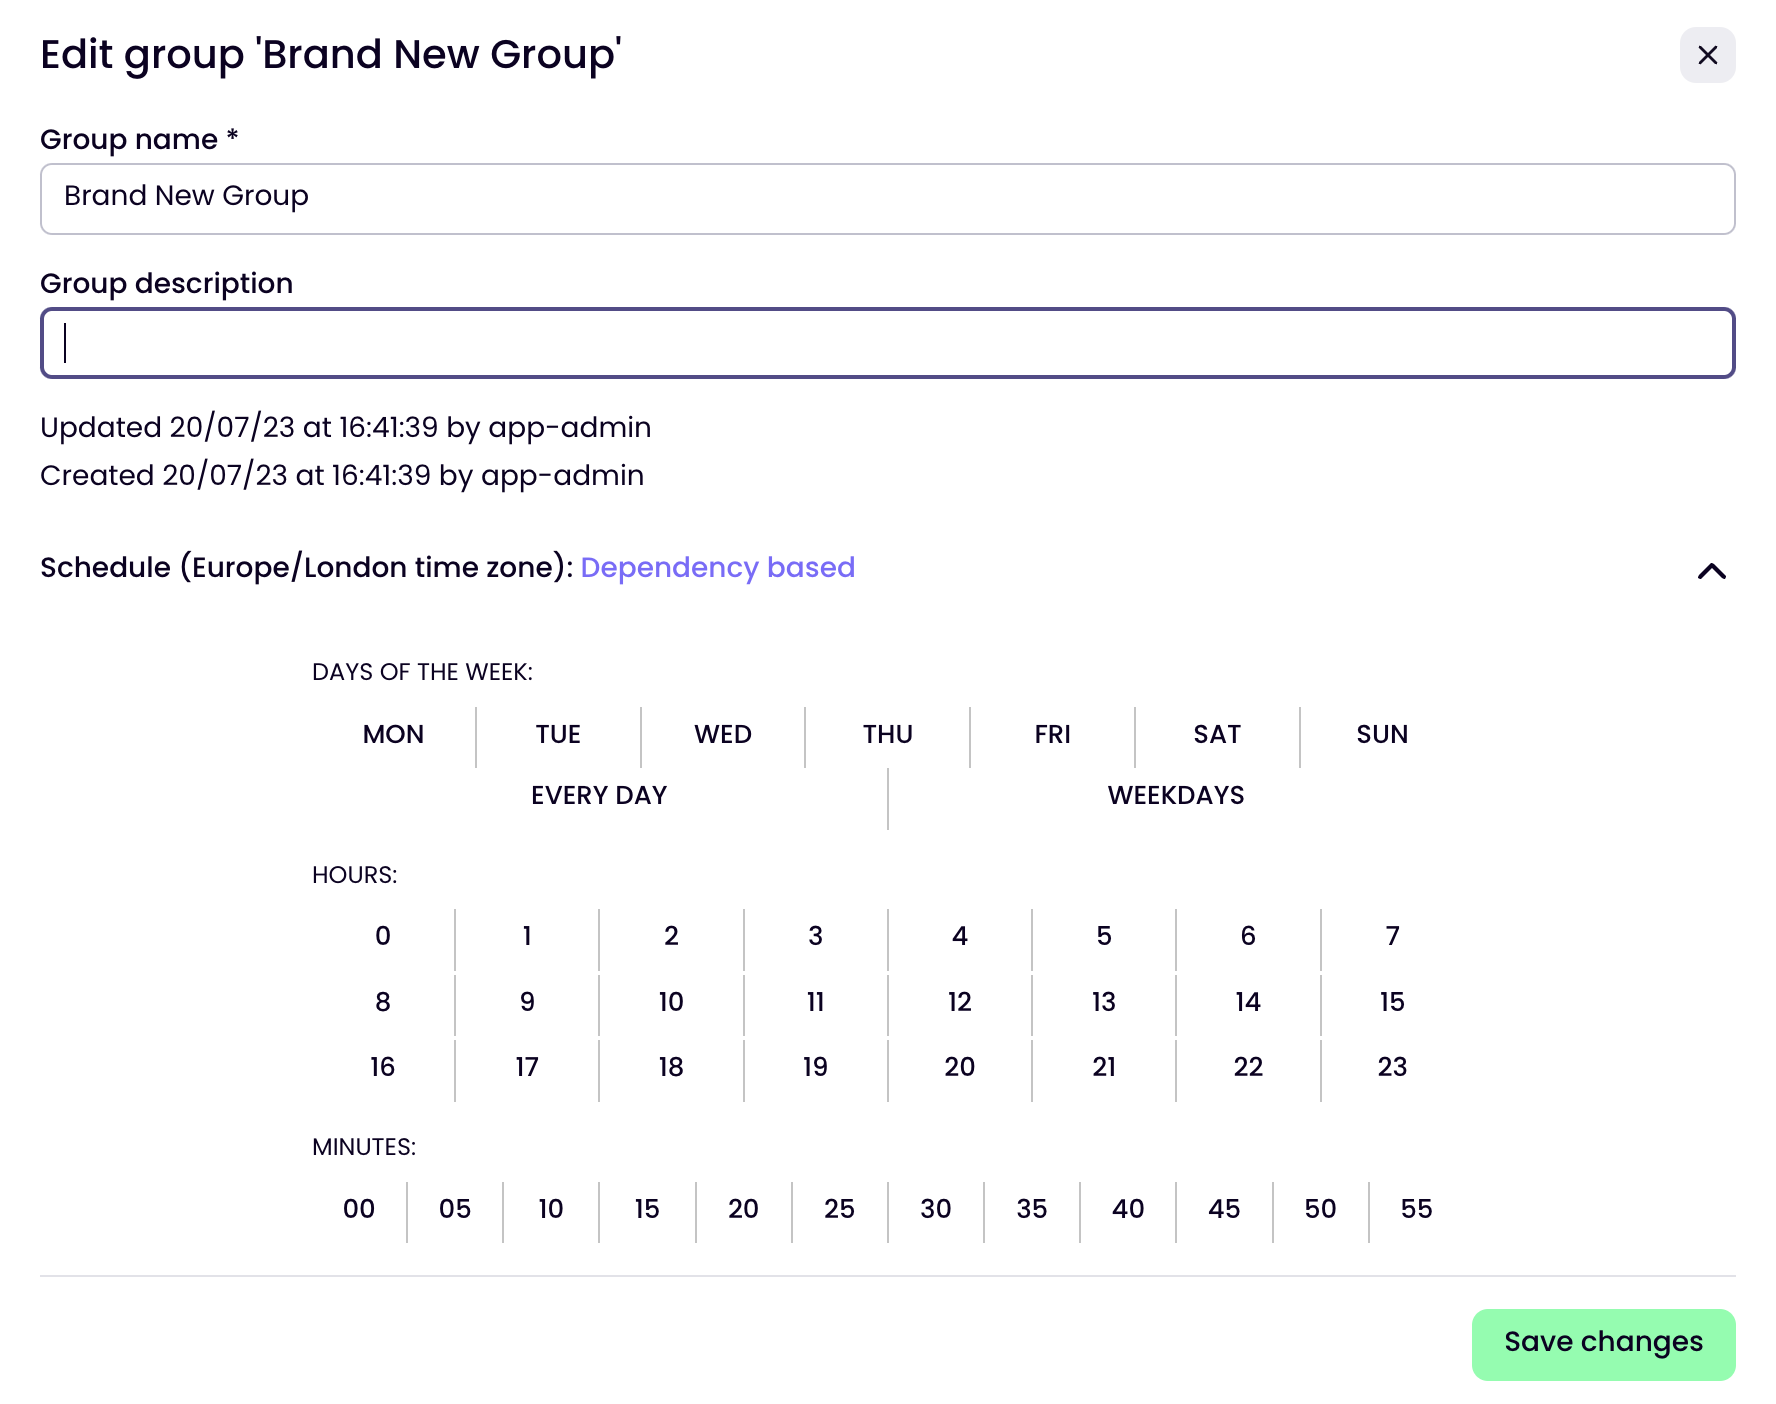
If you need to edit a group, highlight the group in Prod, select the ellipsis (...) and Edit group
From here you can change the name, add/edit the description and add/edit a group schedule.
If you need to delete a group, highlight the group in Prod, select the ellipsis (...) and click Delete group and submit. This will permanently delete the group and it's contents.

Deleting a group will permanently remove the transforms within it
Creating transforms
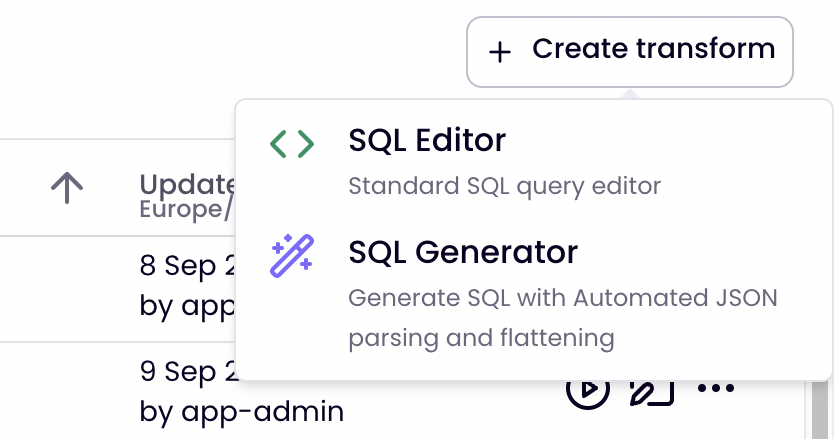
To create a new transform, from within a group select Create transform and the select either SQL Editor which take you to the SQL Console or SQL Generator which will open the Generator flow.
Once finished, your new transform will appear in Dev with a green icon.
Settings
You'll likely need to rename the transform, to do this, click on the more options icon (...) and select Settings.
Here you can also update the description and add tags.
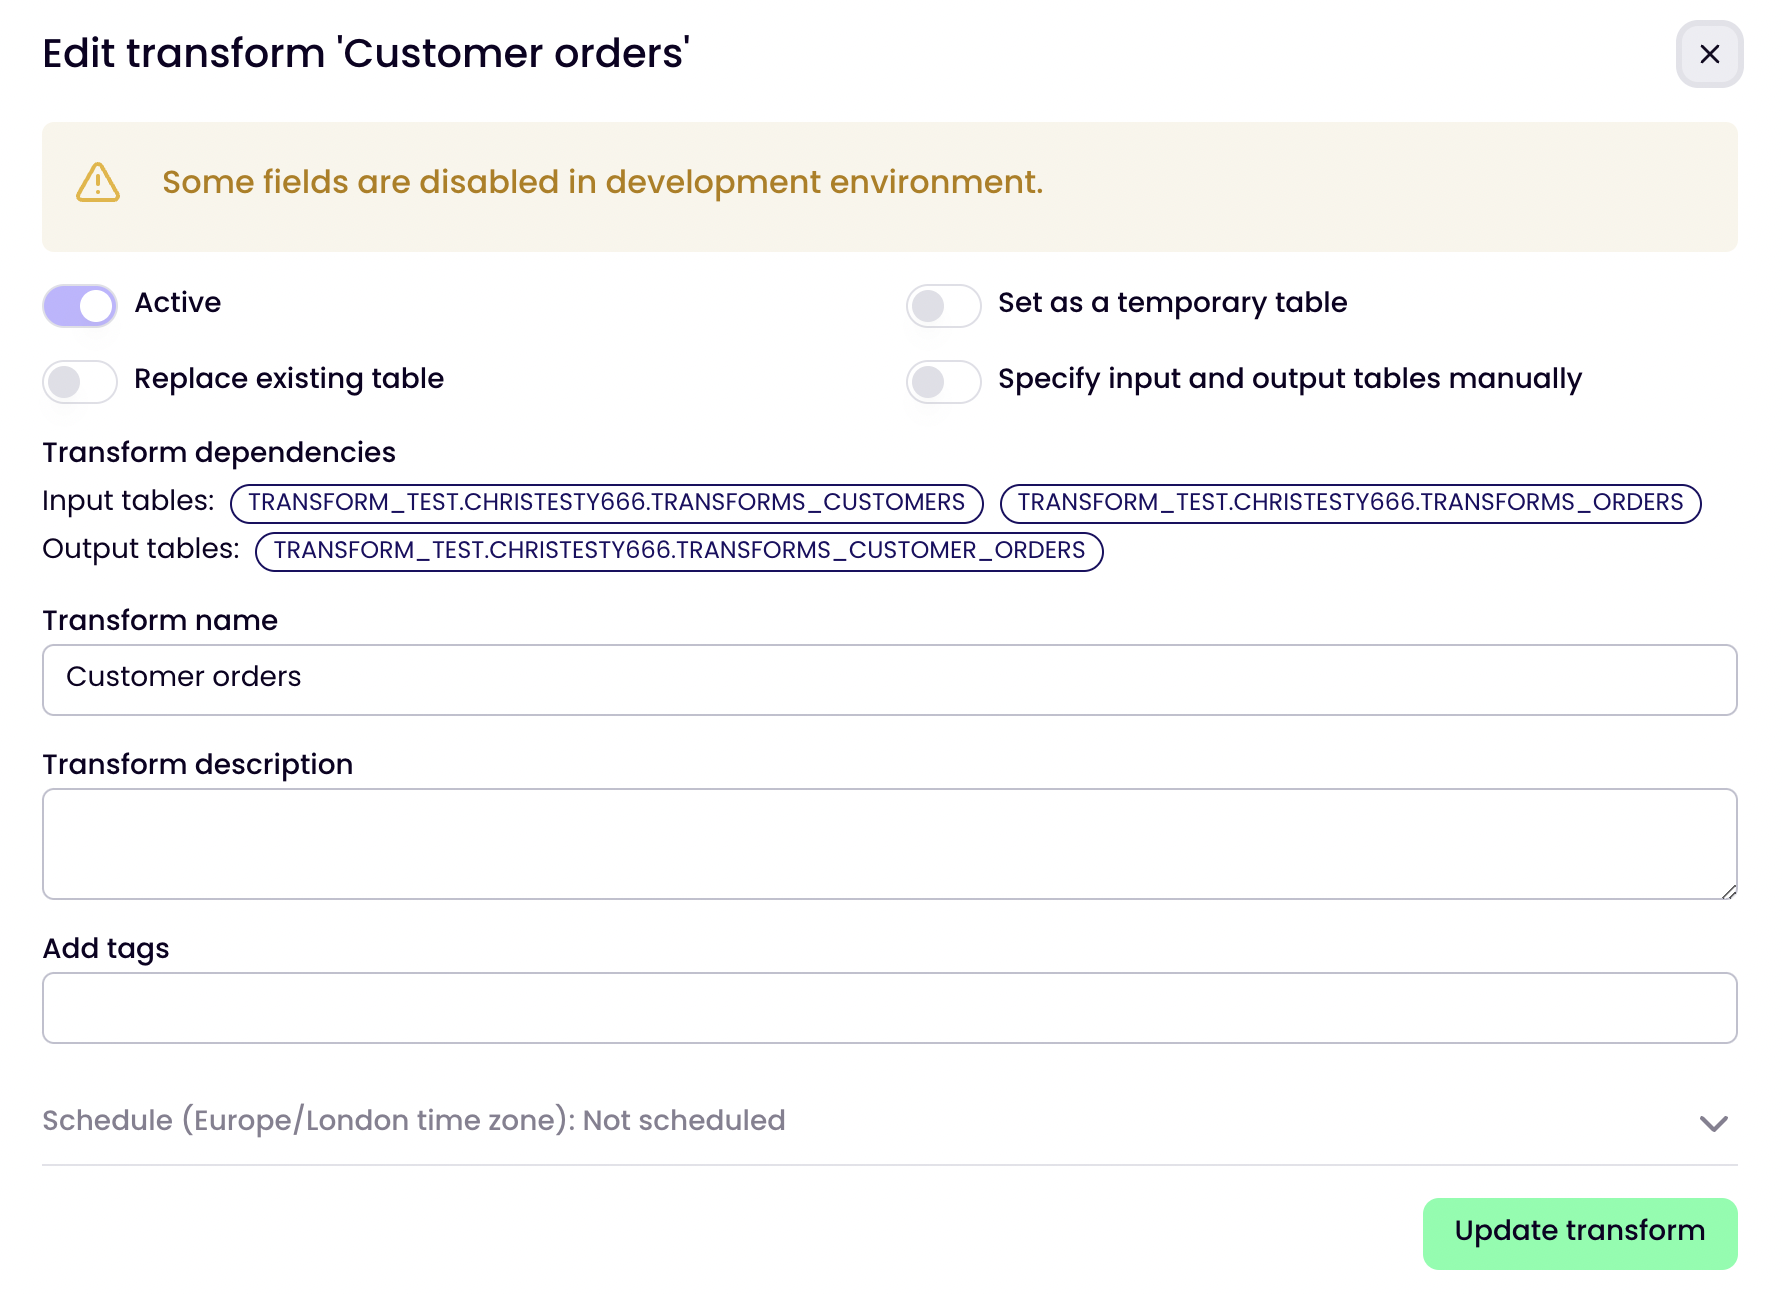
In Prod, Setting also lets user update the Schedule.
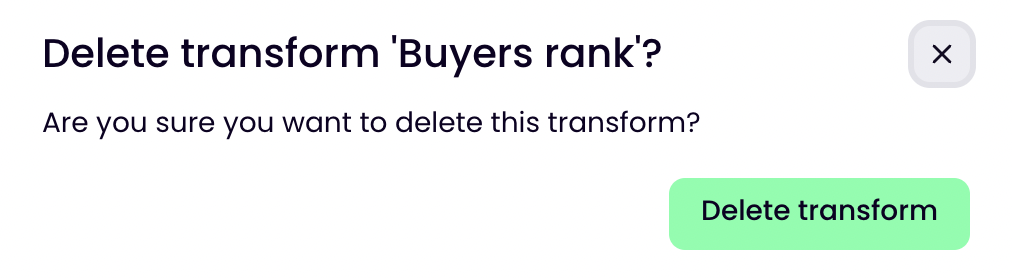
Deleting transforms
From the same menu you can also select a transform to be deleted in the merge process. This does not delete the transform in Prod until you have merged it.
For the moment it is also possible to delete transforms directly in Prod, so you can skip this process whilst it's possible to do that.
Editing transforms
To edit an existing transform, click the edit icon, which will take you to the SQL Console. Here you can see that the transforms are colour coded to match the chosen Dev colour.

Redesigned SQL Console
Duplicate transforms open at the same timeBe careful when editing transforms in the SQL Console as multiple versions of the same transform can be open at the same. The SQL Console will not automatically close them, this is to avoid losing work.
Best practise is Save and Close the transform in the SQL Console.

From the console you can edit and preview the SQL output.
Dev SQL Table References are automatically updated in the merge processWithin the Dev environment the input tables of transforms refer to tables in the Dev schema. Upon merging, these are updated to the reference tables in Prod, meaning here is no need to update transforms' input tables prior to merging.
Console functions
To run a transform, use the green play button.
To save it use the disk icon.
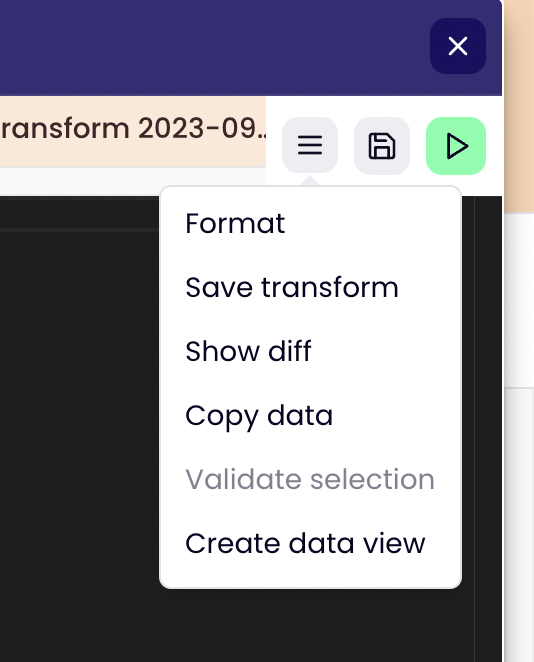
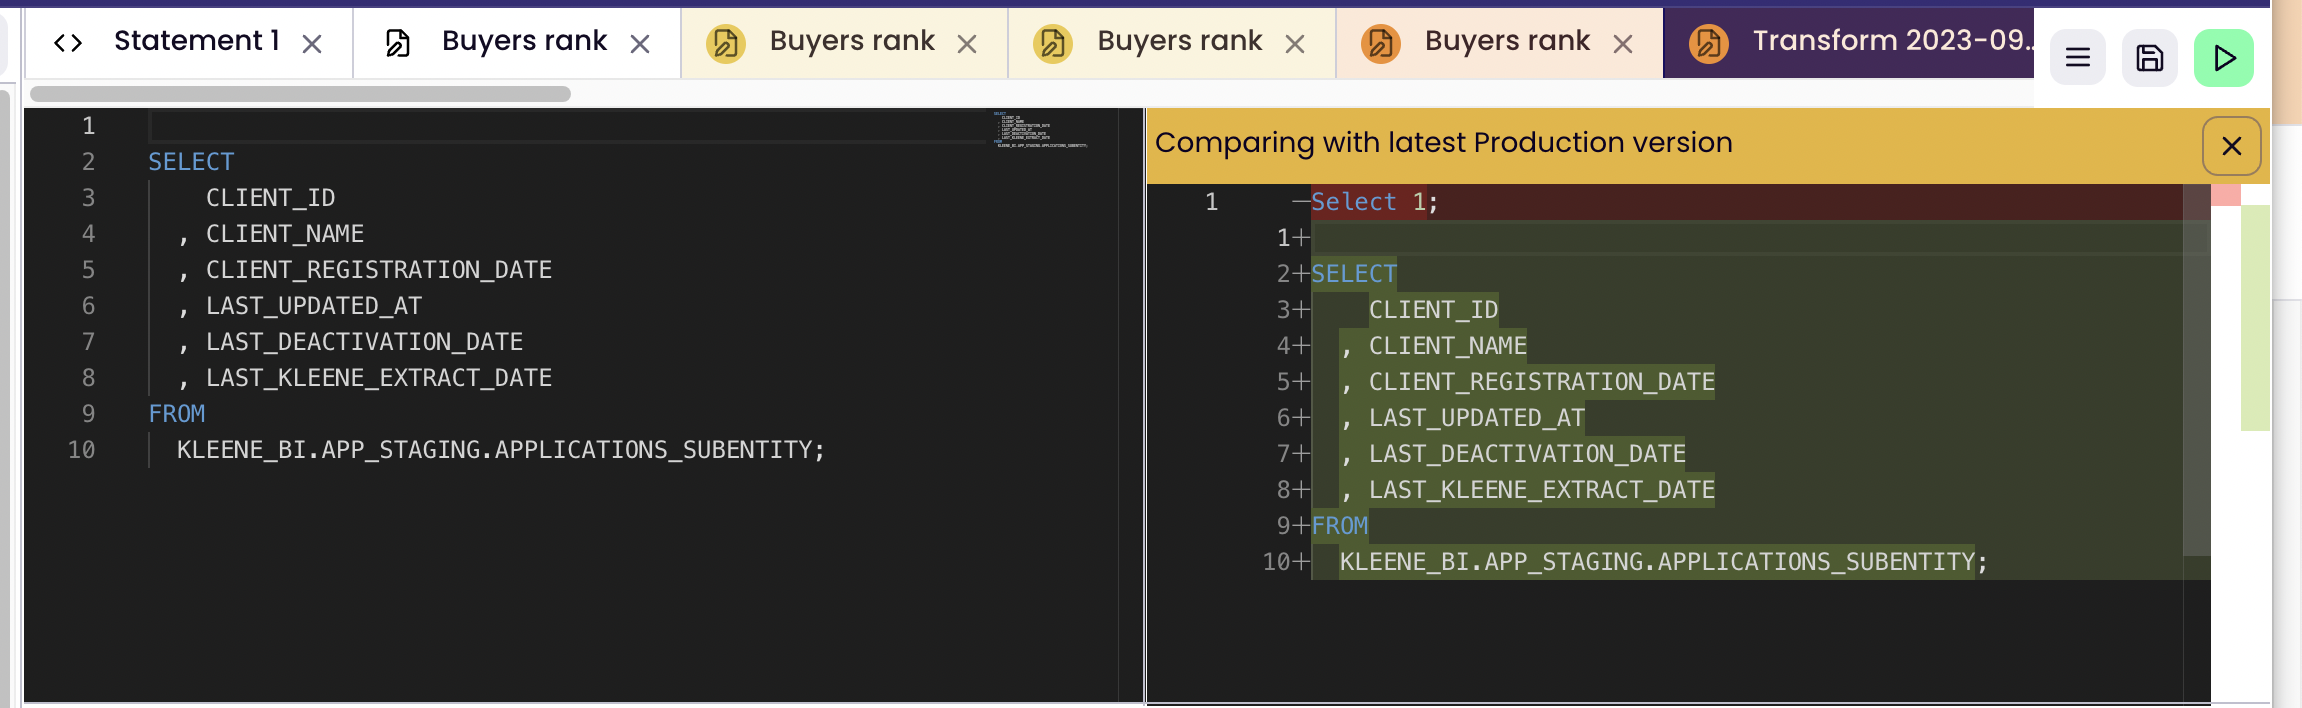
Show diff
To quickly see how the edited transform in Dev compares to the existing Prod version, click Show diff
Running transforms
You can run transforms in several ways in Prod and in Dev, as per the illustration below.
- Run upstream - activate all the transforms from the extract / origin down to this transform (not possible in Dev)
- Run downstream - activate all the transforms downstream from this transform
- Run this - activate this transform one only
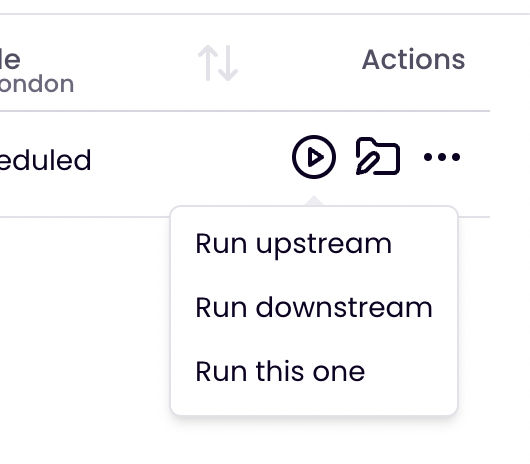
Running a transform
Searching
In Prod you can search for a variety of items, including transform names, tags and in the SQL itself.

Merging
To merge the edited transforms into Prod, select Environment actions > Merge to production and a window will appear. Here you want to select the transforms that will be merged back into Prod.
- Edited transforms will overwrite the version in Prod (but you will be able to roll it back via transform version control)
- New transforms will be added to Prod
- Deleted transform will be removed from Prod. This is not reversible!
Conflicts with ProdSometimes, if the transform has been changed in Prod by a user since the environment was created, you'll notice that there are changes to the SQL in the diff modal on both sides.
In this case you'll need to make sure the changes in Prod are copied into the Dev version before merge. Otherwise the Prod edits will be overwritten.
If needed, you compare diffs again or even edit the transform directly again
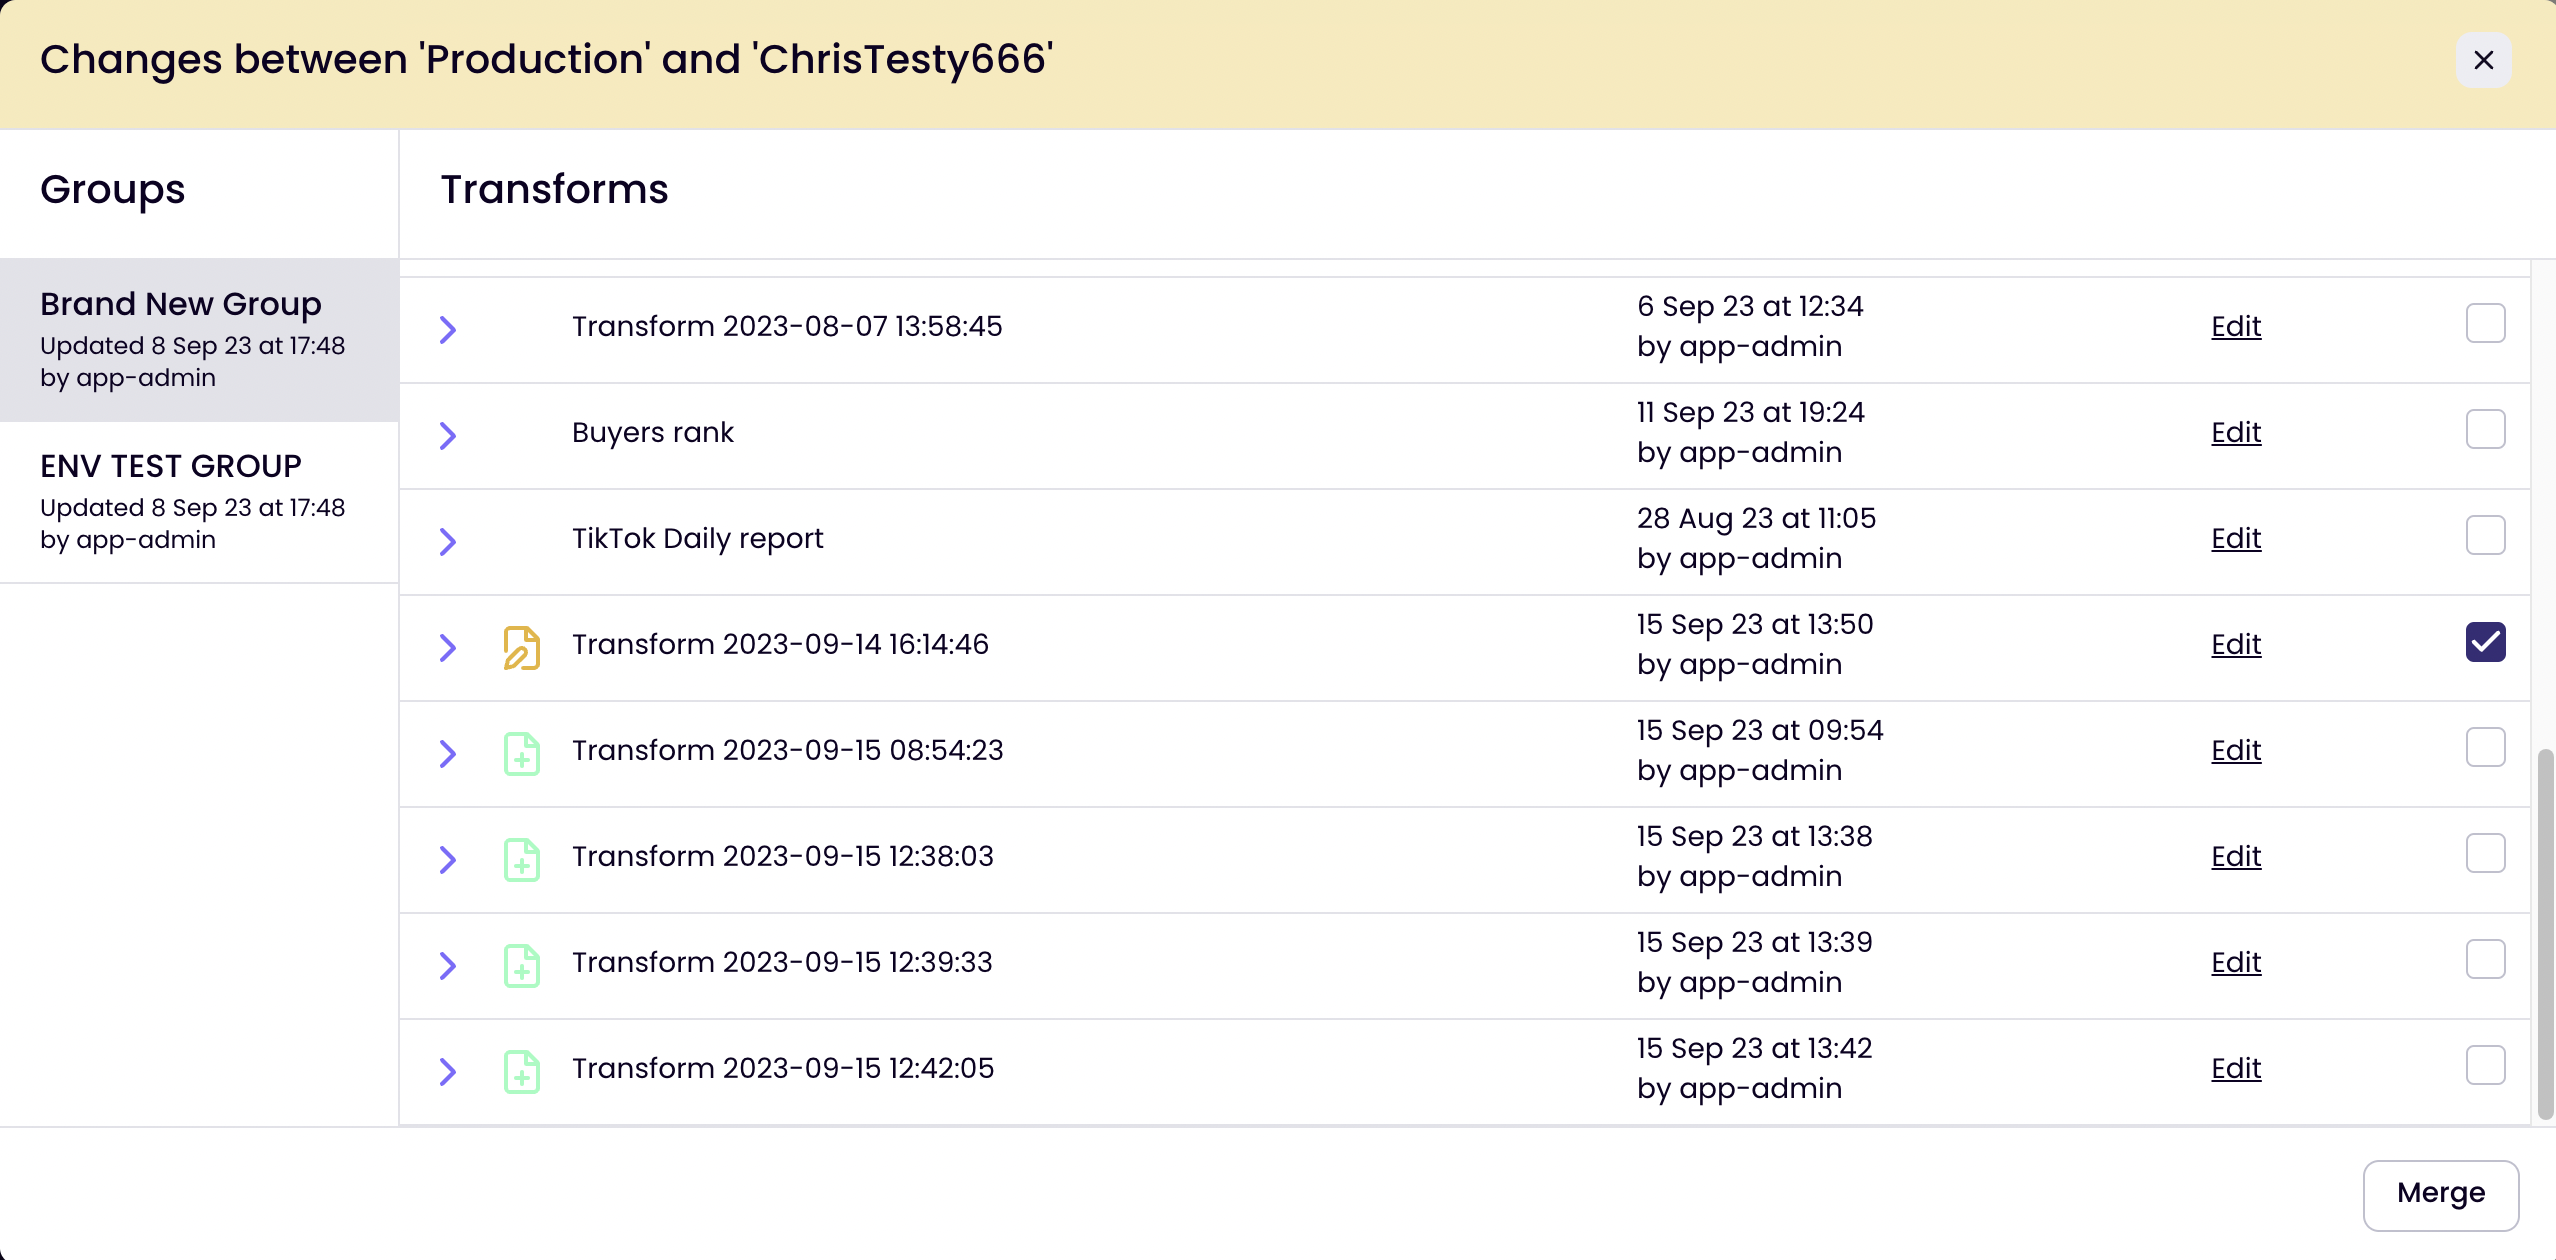
Merge window
Create, edit, test, merge and delete oftenMuch like the branch / version control paradigm, best practice suggests that you create, edit, test, merge and delete the Dev environment often, at most every week.
When Prod has changes which did not exist at the point of creating the branch at the point of merge.
Exclusions
Currently, it does not currently let users do the following -
- Set up more than one environment
- Display the environment transforms on the DAG
- Approve other user's code changes
- Run automatic diff checks
- Version control beyond individual transforms
- Roll back to a previous version of Prod
- Restore the environment after deletion
However, these are all features we'd like to include in future versions.
Updated 8 months ago