
SQL Console
Writing and testing your SQL transforms
Introduction
Our SQL console is an integrated development environment (IDE) within the Kleene application. It enables you to execute SQL queries on objects within your data warehouse. It is feature rich with contextual auto-complete, formatting and a wide range of shortcuts.
Accessing and positioning the SQL console
The SQL Console can be found within the Model section of the navbar. Clicking on the SQL Console will open a window that will overlay the page you are currently on.
By default, the modal will be maximised to fill the screen but double clicking on the purple title bar will exit full screen. The console can be resized by dragging the edges and can be repositioned by dragging the purple title bar.
Executing SQL in the console
Statements
When the SQL console is opened it will open at the last statement you were on. If there were no open statements a new statement called New statement will be opened. To add tabs and navigate between them use the section beneath the purple tile bar.
To rename a statementEither double click the tab title or select Rename form the Console menu
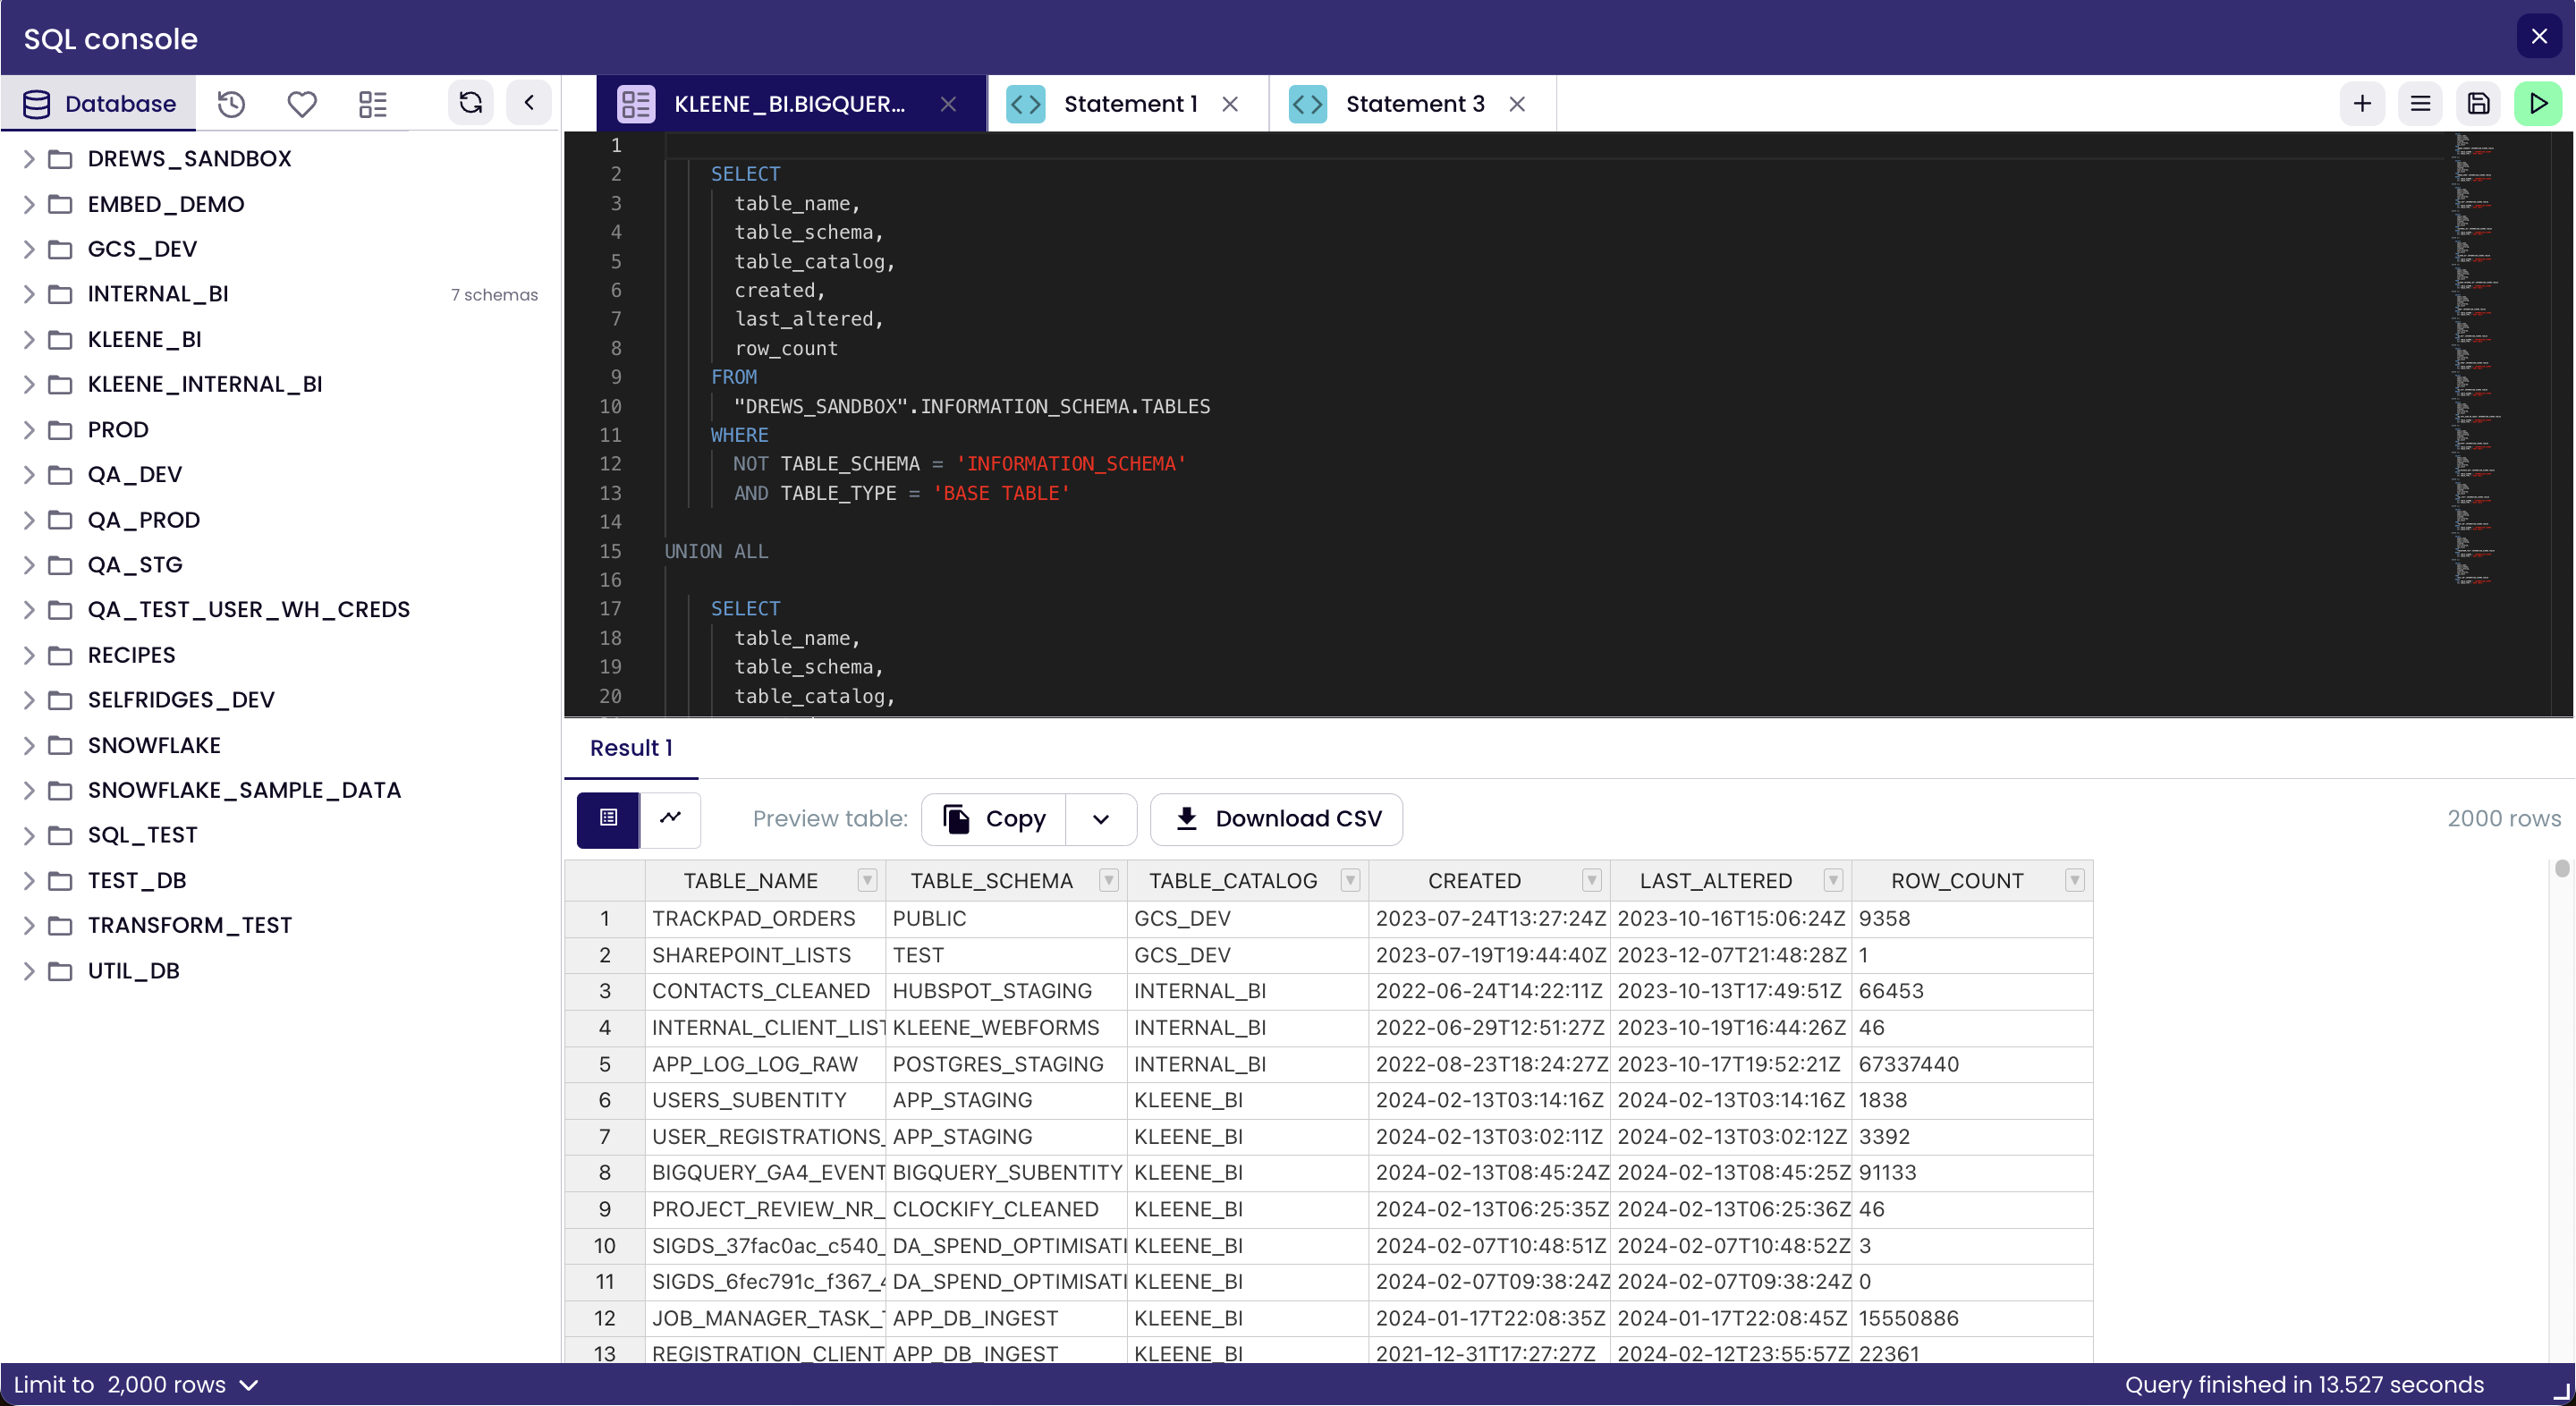
Executing and validating statements
Type the SQL you want to execute into the console. To fast track your SQL writing, contextual auto-complete options will appear as you type, just press tab to use any of the suggestions. You can also copy table names and generate SELECT statements by right clicking on tables in the database structure. Once you are happy with the SQL query/queries you have written you can execute the SQL either by clicking on the green execute button shown in the top right of the image above or by clicking Ctrl+ Enter or Cmd + Enter. If you only want to execute some of the SQL written in the console then highlight this SQL using your cursor and execute in the same way. The results of the query will show in the results pane.
Limited results set
By default only the first 2,000 rows will be shown in the results pane. This can be changed to 200 or 20,000 by clicking on the dropdown in the bottom left of the modal where it says Limit to 2,000 rows. In the top right corner of any tab in the results pane the row count of the resulting preview table is displayed. If the row count of the preview table matches the limit this indicates the preview table does not represent the full results set, to retrieve this you must create a data view. To do this click on the options icon next to the execute button and choose Create data view. For more information about data views read our documentation.
Query execution time
In the bottom right-hand side of the SQL console modal there is a timer recording how many seconds it takes for the SQL statement to be executed in the data warehouse. Once the query has been executed it returns Query finished in x seconds. Statements that take longer than 3 minutes to execute will timeout in the console. To address this problem please do one of the following:
- modify the long running SQL query to reduce the execution time
- execute the SQL query within a transform where the limit is not imposed
- execute the SQL query within the warehouse's own console
Results pane
The results pane shows a preview of the table(s) generated by the query/queries executed in the chosen statement. If more than one query is executed within the statement (as delimited by ;) then the preview tables will appear as numbered results tabs. If you wish to copy the result set into a different platform e.g. Excel you can click the Copy button and you will be able to Paste the results table into the platform. You can also download the results set as a CSV.
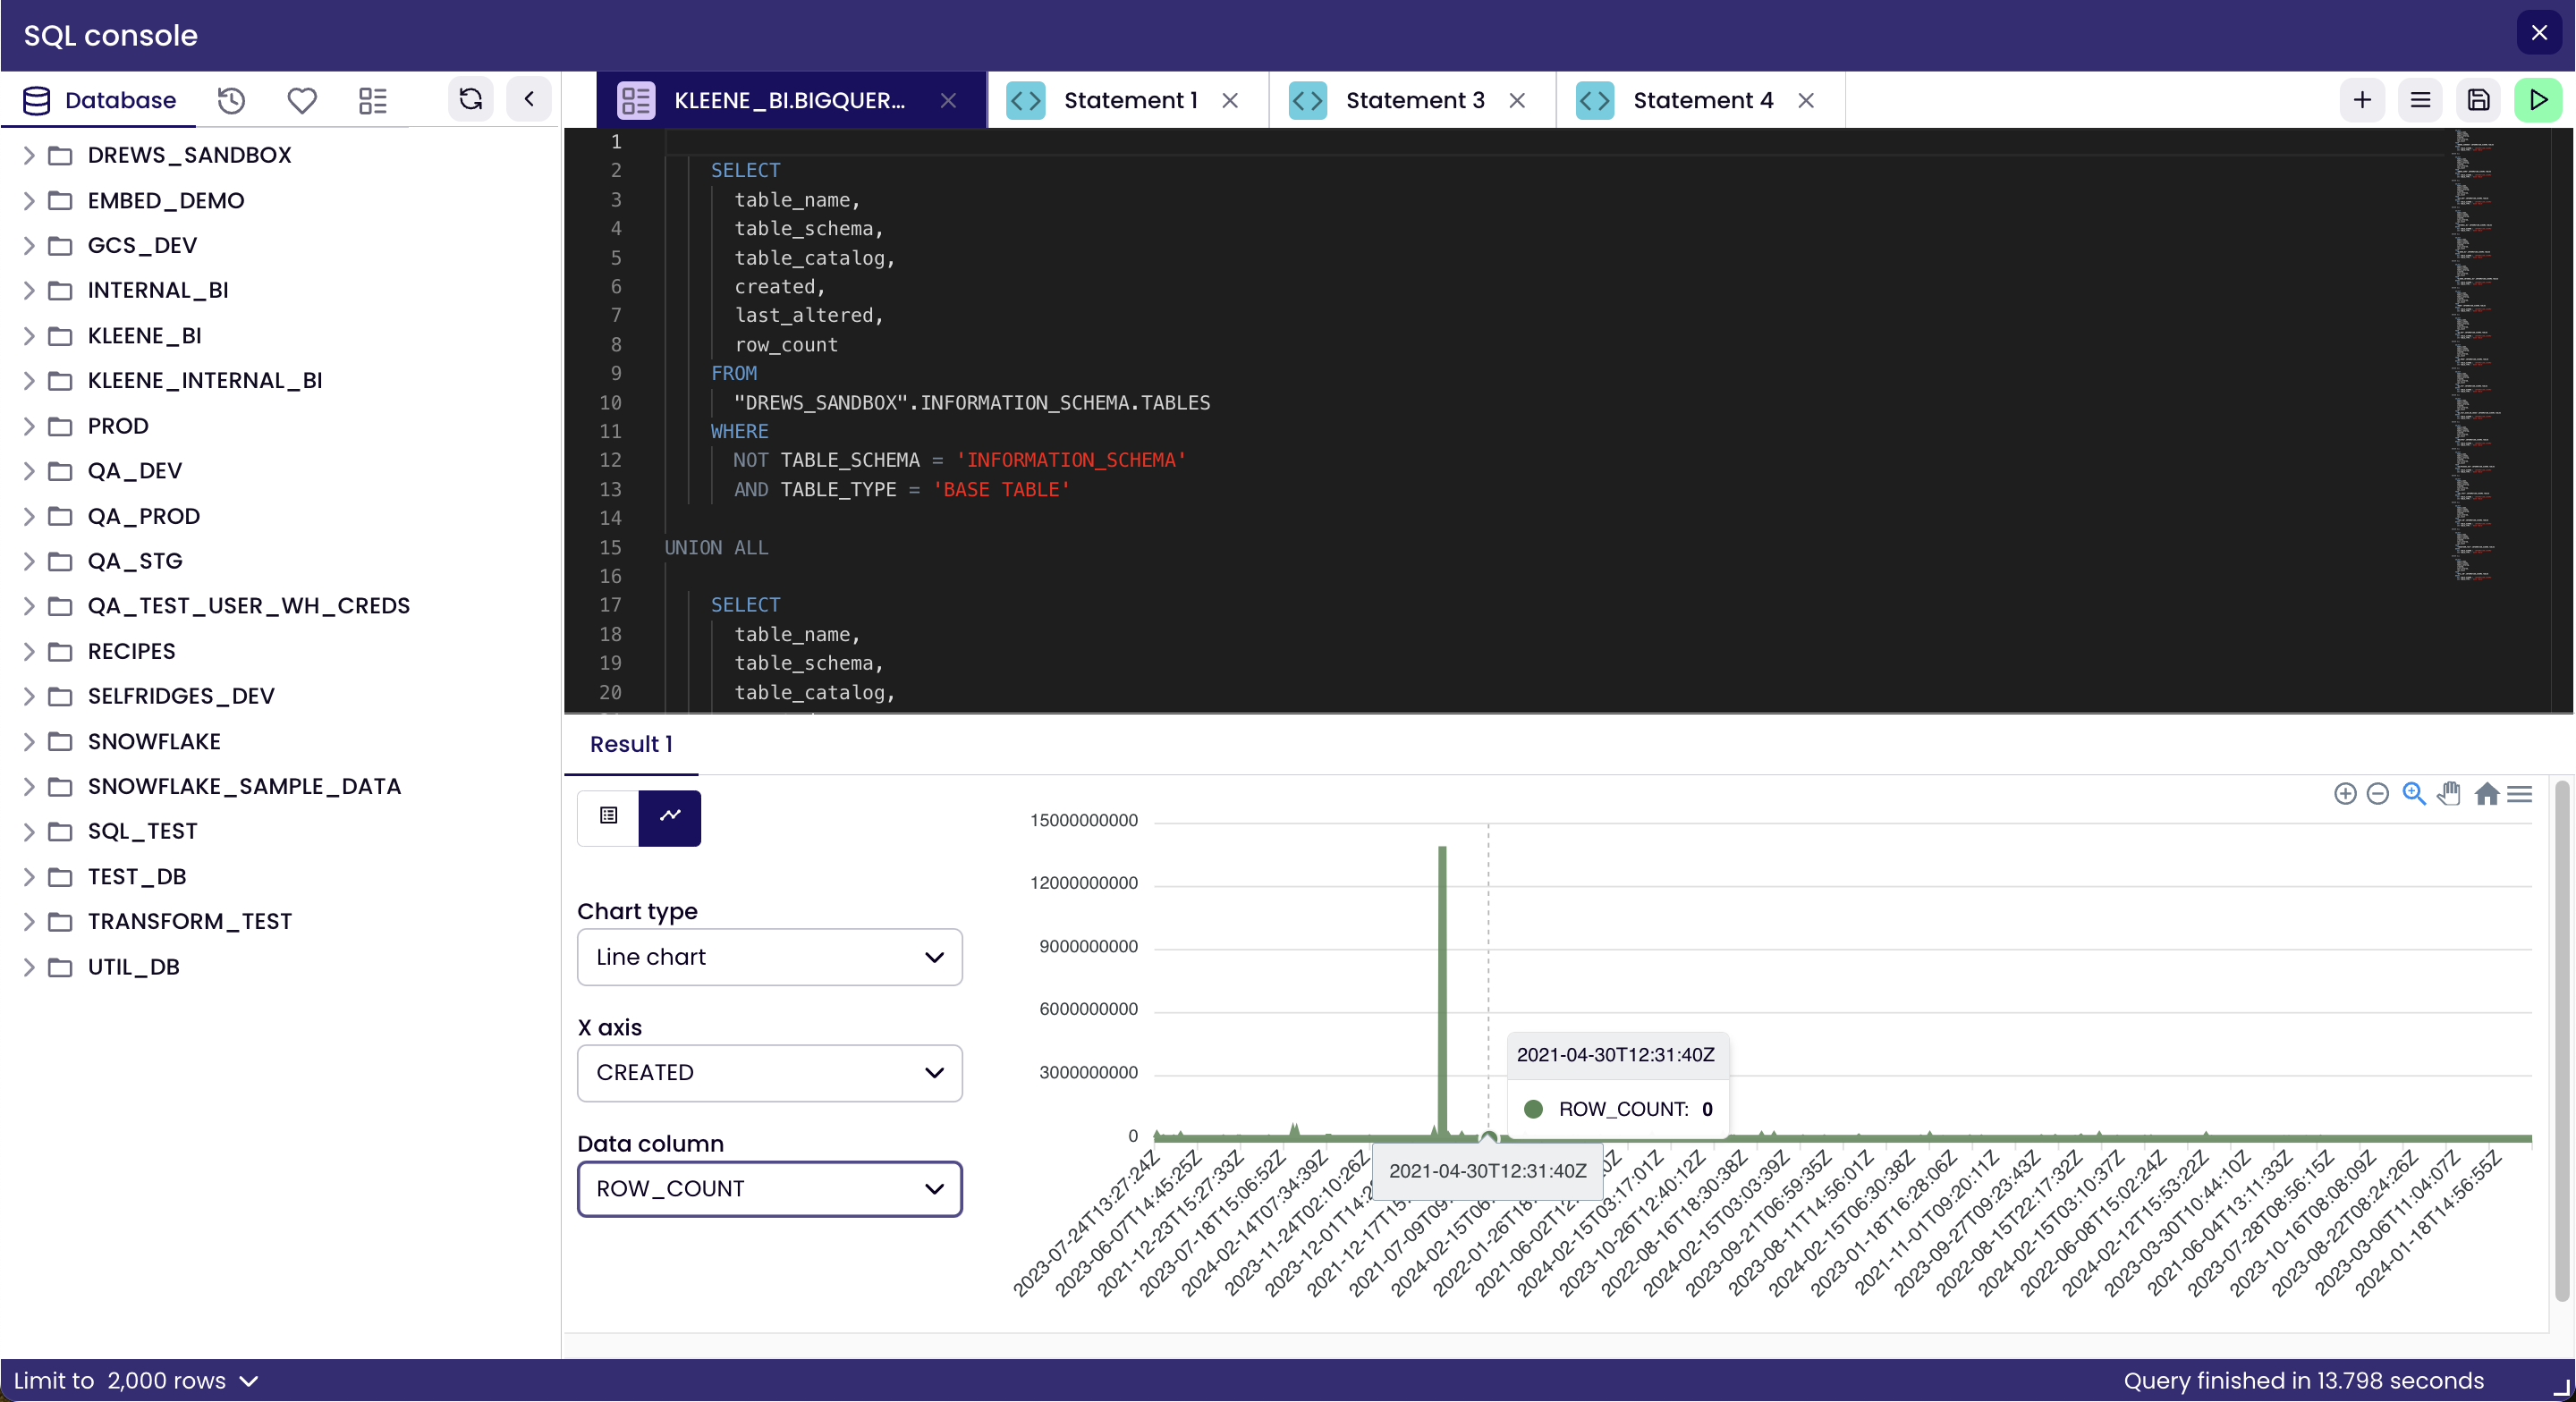
Simple charts
A basic line, bar or chart of any two columns in the preview table can be generated by choosing the graph option as indicated in the image below. Simply choose the type of bar chart and choose which columns you wish to use as the x and y axes. Charts can be downloaded as SVG or PNG files by clicking on the options icon in the top right of the chart.
Aggregations in chartsThe charts do not by default aggregate columns so if you want to aggregations such as COUNT or AVG please specify these in the SQL statement.
The sidebar
The sidebar contains four tabs; Database, History, Favourites and Transforms. The sidebar can be collapsed to give more horizontal screen space for the console. To do this click this arrow <in the top right of the sidebar.
Database
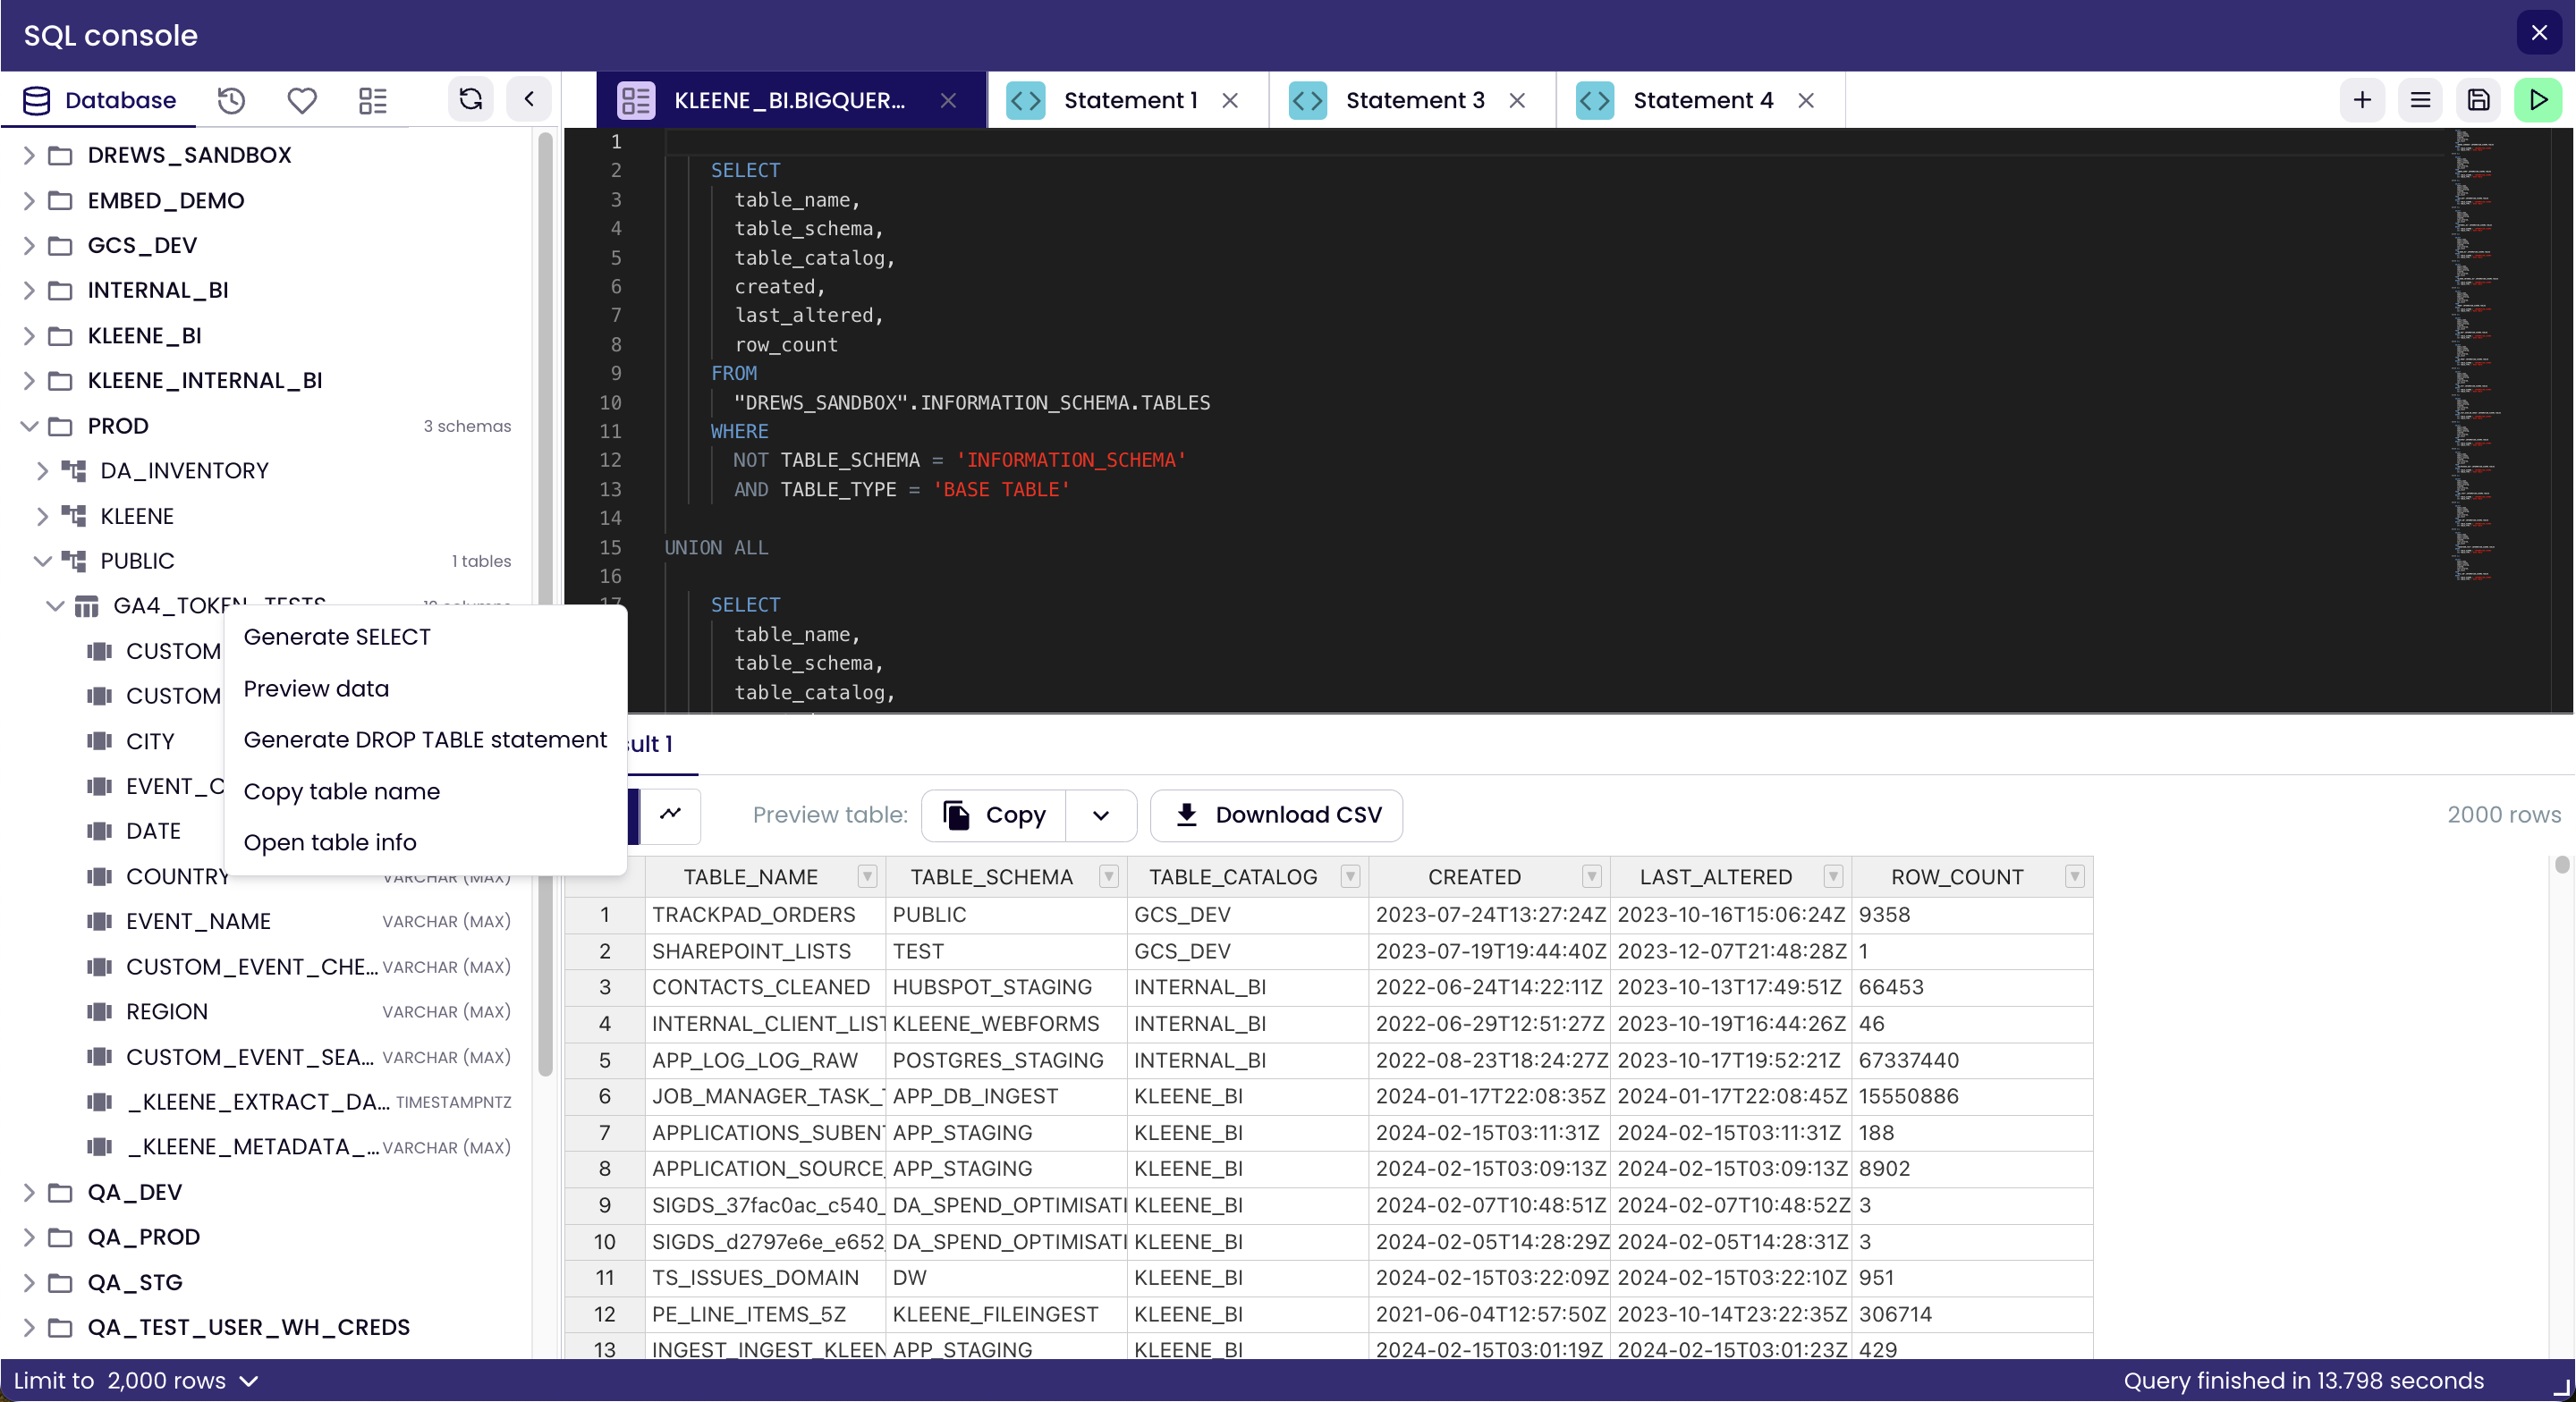
The database structure will present every object in the warehouse the user has sufficient privileges to view in a hierarchy from the database down to the column. Clicking on any object in the database structure will reveal all of the object's child elements. The database structure will be loaded upon login but if subsequent changes are made then it is necessary to click the refresh button in the top right corner of the sidebar for the database structure to reflect these changes. Right clicking on any table within the database structure displays a list of options:
- Generate select - Populates the console with a SELECT statement containing all the columns FROM the chosen table
- Preview data - Presents a preview of the table in the results pane. It is the equivalent of executing a SELECT * statement on the chosen table except no SQL is written in the console
- Generate DROP TABLE statement - Populates the console with a DROP TABLE statement for the chosen table
- COPY table name - Copies the fully qualified table name (including database and schema) into your clipboard such that you can paste it wherever needed
- Table info - Opens the table info page in a separate tab. For more information on this page please read our docs
History
The history tab shows the list of statements this user has executed. The list is ordered by the timestamp of execution with the most recent first. Clicking on any of the statements within the history tab will clear the current contents of the console and replace it with the SQL from the chosen statement. Hovering over any of the statements will show a pencil icon, this gives you the option to name the statement. Clicking the heart icon will add the statement to your favourites.
Favourites
The favourites tab shows the list of statements the user has chosen as favourites from history. The list is ordered by the timestamp at which the statement was favourited with the most recent first. All other functionality matches History.
Transforms
This tab shows all the transforms saved in Kleene.
- Single-clicking a transform will open it in preview mode, useful for when you need to check the code quickly. It will close again if you select another transform.
- Double-clicking a transform opens it in edit mode, used for when you want to actually change something in the code. When

When a transform has been edited, a dot appears over the close icon and you are prompted to Save it or lose the changes.
Shortcuts and more options
Shortcuts
To display a full list of the shortcuts press F1. Here are some of the most used ones:
- Add selection to next find match - This will select the next text that matches the highlighted text
Ctrl+D - Transform to lower/upper case - If you have written text in the wrong case it can be transformed to the correct case using this
- Replace All - All text that matches the 'find' string will be replaced with the text in the 'replace' string
Vertical select and re-ordering
To select the same point along all lines in SQL click the scroller on your mouse and drag the mouse up or down. You can then highlight the text before or after this point. This will often be used when needing to make the same amendments to multiple lined of SQL. In conjunction with vertical select it is useful to highlight part of the SQL and use Alt and the up or down arrows to re-order the SQL as well as using Ctrl and the right and left arrows to navigate along the column-level SQL.
Format SQL
Before saving your SQL as a transform or sharing it with other users ensure it is readable by using our 'Format' option. This can be found in the options menu next to the execute button.
Create transform
You are able to create a transform directly from the SQL console by clicking 'Create Transform' option. This can be found in the options menu next to the execute button. After doing this you will need to select which transform group to store this transform in. You will then be navigated to the Transforms page.
Updated 9 months ago