
Bastion Server Set Up (Linux/Win)
Setting up a bastion server for access to a non-AWS hosted database as a source
Context
Bastion hosts add an extra layer of security to the host architecture. It isolates your internal network from the Internet. Configured correctly, a bastion is a secure way for controlled access to your internal network from an external service. Usually, the bastion host does act as proxy server. It allows and denies connection as created by your security policy. In this guide we will run through the steps needed to ensure that the kleene.ai application can securely and reliably connect to your database.
Visual Map of the architecture

Bastion Setup Visualisation
Linux Setup
A Linux based bastion host can be build using the following steps:
Installation -
- Install OpenSSH
sudo yum install -y openssh-server
sudo systemctl enable sshd
sudo systemctl start sshd- If needed, open port of the firewall with:
sudo firewall-cmd --permanent --add-service=ssh
sudo firewall-cmd --reload
Create User and Key to share with Kleene -
- Create a new user:
sudo useradd -m -c "SSH Tunnel User" kleene- Set a password for the new user:
sudo passwd kleene- Change the security context to the kleene account so that folders and files you create will have the correct permissions:
sudo su - kleene- Create an ssh directory for the user:
mkdir -p ~/.ssh- Change the directory permissions:
chmod 700 ~/.ssh- Generate the key:
ssh-keygen -b 4096
Generating public/private rsa key pair. Enter file in which to
save the key (/Users/[user_dir]/.ssh/id_rsa):- Please leave it empty, just press enter.
Enter passphrase (empty for no passphrase): [passphrase] Enter same
passphrase again: [passphrase]- Copy the public key generated to the user's .ssh directory:
sudo cp <path_to_your_public_key> /home/kleene/.ssh/authorized_keys- Change the permissions of the authorized_keys file:
sudo chmod 600 /home/kleene/.ssh/authorized_keys- Change the ownership of the .ssh directory to the new user:
sudo chown -R kleene:kleene .ssh/- Copy out the private key
id_rsato local and follow instruction under Setting up authentication section to complete the setup.
Important:If you use OpenSSH with version 8.8 or higher, the use of RSA keys are disabled by default. To enable the use of RSA keys, you must modify your sshd_config file (in /etc/ssh) and add the following lines:
PubkeyAcceptedAlgorithms=+ssh-rsa,[email protected]
HostKeyAlgorithms=ssh-rsa,[email protected]
Windows Setup
Using OpenSSH, it is possible to encrypt all traffic between client and server to eliminate eavesdropping, connection hijacking, and other attacks. To install OpenSSH, open Windows Powershell (follow instructions to installing Powershell here.
To validate your environment, run the following in the Powershell:
-
Type winver.exe and press enter to see the version details for your Windows device.
-
Run <$PSVersionTable.PSVersion>. Verify your major version is at least 5, and your minor version at least 1.
-
Run the command below. The output will show True when you're a member of the built-in Administrators group.
(New-Object Security.Principal.WindowsPrincipal([Security.Principal.WindowsIdentity]::GetCurrent())).IsInRole([Security.Principal.WindowsBuiltInRole]::Administrator)(If it returns false, try running the Powershell as Administrator)
Installing OpenSSH on Windows
To make sure that OpenSSH is available, run the following cmdlet:
Get-WindowsCapability -Online | Where-Object Name -like 'OpenSSH*'The command should return the following output if neither are already installed:
Name  : OpenSSH.Client~~~~0.0.1.0
State : NotPresent

Name  : OpenSSH.Server~~~~0.0.1.0
State : NotPresent
Then, install the server or client components as needed:
# Install the OpenSSH Client
Add-WindowsCapability -Online -Name OpenSSH.Client~~~~0.0.1.0

# Install the OpenSSH Server
Add-WindowsCapability -Online -Name OpenSSH.Server~~~~0.0.1.0
Both commands should return the following output:
Path          :
Online        : True
RestartNeeded : False
To start and configure OpenSSH Server for initial use, open an elevated PowerShell prompt (right click on the app, Run as an administrator), then run the following commands to start the sshd service:
# Start the sshd service
Start-Service sshd

# OPTIONAL but recommended:
Set-Service -Name sshd -StartupType 'Automatic'

# Confirm the Firewall rule is configured. It should be created automatically by setup. Run the following to verify
if (!(Get-NetFirewallRule -Name "OpenSSH-Server-In-TCP" -ErrorAction SilentlyContinue | Select-Object Name, Enabled)) {
    Write-Output "Firewall Rule 'OpenSSH-Server-In-TCP' does not exist, creating it..."
    New-NetFirewallRule -Name 'OpenSSH-Server-In-TCP' -DisplayName 'OpenSSH Server (sshd)' -Enabled True -Direction Inbound -Protocol TCP -Action Allow -LocalPort 22
} else {
    Write-Output "Firewall rule 'OpenSSH-Server-In-TCP' has been created and exists."
}
After that, confirm the OpenSSH Authentication Agent is running by following these steps:
- Open
Manage optional featuresfrom the start menu and make sure you have Open SSH Client in the list. If not, you should be able to add it. - Open
Servicesfrom the start Menu - Scroll down to
OpenSSH Authentication Agent> right click > properties - Change the Startup type from
Disabledto any of the other 3 options. Recommended isAutomatic (Delayed Start)
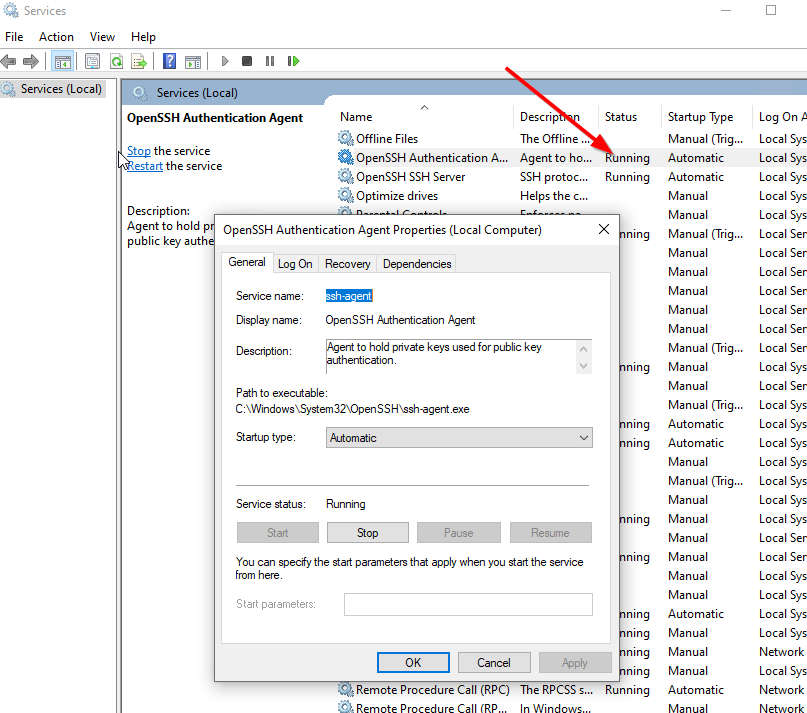
OpenSSH Authentication Agent is running
Next step is to create the Kleene user and group:
- Add a local Kleene user (replacing 'password' with the real password to set).
net user kleene <password> /add /comment:"User for establishing SSH connection to Kleene service." /passwordchg:no /passwordreq:no /logonpasswordchg:no- Add a Kleene group, then add Kleene user to the group.
net localgroup kleene-group /comment:"Group for establishing SSH connection to Kleene service." /add
net localgroup kleene-group kleene /add- Now switch to the ssh directory (you may need to alter the path for your machine). If the statements don't run together, try removing the '&&' and running them separately.
cd C:\ProgramData\ssh\; start notepad .\sshd_config- Allow the Kleene user connection to the SSH server by adding the following line to the sshd_config file.
AllowUsers kleene- If your Windows build is 1809 or later, comment out the following lines in the sshdconfig file:
(Remember from earlier that you can check this by running this cmdlet '_winver.exe')
# Match Group administrators
# AuthorizedKeysFile __PROGRAMDATA__/ssh/administrators_authorized_keys- Public key authentication is disabled by default in the OpenSSH server on Windows. You can check this in the sshd_config and uncomment the line:
PubkeyAuthentication yes- Also, you will have to disable the StrictModes option in the sshd_config config file. By default, this mode is enabled and prevents SSH key-based authentication if private and public keys are not properly protected. Uncomment the line and update with 'no':
StrictModes no- Save the sshd_config file. Then restart the agent and the sshd service. (If the following command fails, you can restart from the Task Manager [Alt + Ctrl + Del] or Services app)
Restart-Service ssh-agent; Restart-Service sshdKey Generation in Windows
- SSH log into Windows Server using the username and password created above
ssh kleene:<user_password>@<Public IPv4 DNS>- Create an .ssh folder in your home directory.
mkdir .ssh- Create the key , firstly make user you are in
.sshfolder withinC:\Users\<kleene>
cd .ssh
ssh-keygen -C "kleene" -t ed25519
By default, the ssh-keygen tool generates RSA 2048 keys. Currently, it is recommended to use ED25519 instead of RSA keys.
You will be prompted to enter a file to save the key to, which you should name something like 'id_ed25519_kleene'. Then when you are prompted to provide a passphrase, leave empty and press Enter.

Generate key pairs
Should now be able to see the keys in users<kleene>.ssh directory:
- id_ed25519 – private key
- id_ed25519.pub – public key
After the SSH keys are generated, you can add your private key to the SSH Agent service, which allows you to conveniently manage private keys and use them for authentication. The contents of your public key needs to be placed on the server into a text file called authorized_keys in C:\Users\<kleene>\.ssh\
- Add an authorized_keys file and copy the public key to authorized_keys.
type null >> authorized_keys
copy /y id_ed25519.pub authorized_keys- Add your private key to the ssh-agent database:
ssh-add "C:\Users\kleene\.ssh\id_ed25519"
Identity added
- Copy out the private key
id_ed25519to local machine and follow instruction under Setting up authentication section to complete the setup.
Now you can connect to your Windows SSH server without a password.
Important:If you use OpenSSH with version 8.8 or higher, the use of RSA keys are disabled by default. To enable the use of RSA keys, you must modify your sshd_config file and add the following lines:
PubkeyAcceptedAlgorithms=+ssh-rsa,[email protected]
HostKeyAlgorithms=ssh-rsa,[email protected]
Test Connection
To connect to OpenSSH Server from a Windows or Windows Server device with the OpenSSH client, open a PowerShell prompt, run the following command (replacing the 'Public IPv4 DNS').
ssh -i <path/to/private_key/id_ed25519_filname> kleene@<Public IPv4 DNS>Once connected, you get a message similar to the following output:
The authenticity of host 'servername (10.00.00.001)' can't be established.
ECDSA key fingerprint is SHA256:(<a large string>).
Are you sure you want to continue connecting (yes/no)?
Entering yes adds that server to the list of known SSH hosts on your Windows client.
If all the permissions are correct and the authorisation was made successfully via the keys, you'll see the Windows command shell prompt:
<domain>\kleene@<SERVERNAME> C:\Users\kleeneExternal access to the bastion
Ensuring the bastion can be accessed by the kleene.ai application requires whitelisting the kleene.ai production IP in your relevant security group - please get in touch with your customer success manager so they can share with your the correct details for whitelisting.
Setting up authentication
The app uses key based authentication with SSH, so you will have to create either a private .pem file or use the private key (for Windows setup) which can be dropped into the connection setup screen in the kleene.ai app.

Attach key in app
Confirming the connection
Add bastion and database credentials to kleene.ai application source screen and create a new database source.
To test whether this connection works, set up a new extract from this source and ensure that you can bring data back from the database server.
Once bastion access has been set up client side, the kleene interface will request the following details:
- Bastion Hostname
- Bastion User
- Bastion Pem Key
Updated 8 months ago