Netsuite
Version 0.0.1
Check out the API docs here for more information.
Set up
Enable the Connect Service feature
- Ensure that your Account Administrator has enabled your Account and Role with the Connect Service feature.
- Navigate to Setup > Company > Enable Features.
- Click the Analytics tab.
- Check the SuiteAnalytics Connect box.
Create new Custom Role to assign to integration user
Create a new custom role that will be responsible for handling the integration with Kleene.
Ensure 2FA is disabled for this role.
This can be done by going to Setup -> Users/Roles -> Manage Roles -> New
SuiteAnalytics Connect – Read All Permission
As of 2018, the SuiteAnalytics Connect – Read All permission enables users to have read-only access to NetSuite data using the Connect Service, regardless of what they can access in the NetSuite user interface. This permission applies to the NetSuite.com data source only.
Assign this permission to the role created in the previous step.
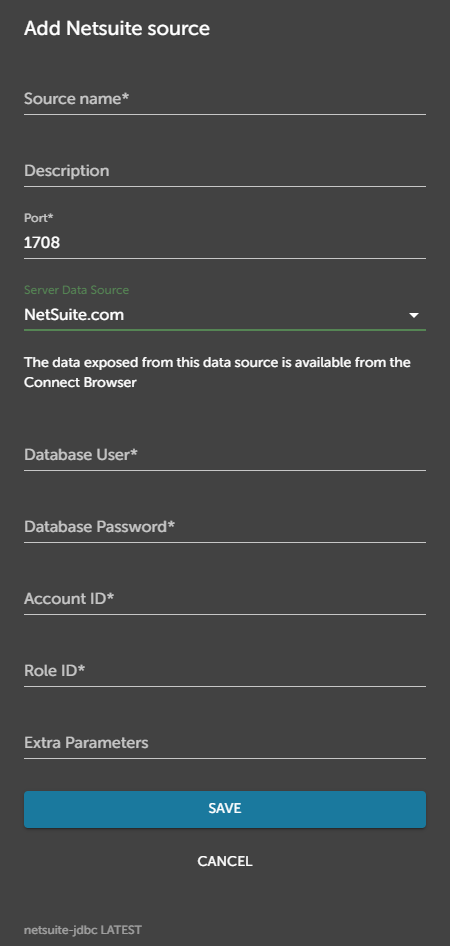
Details required to establish Netsuite.com Data Source connection
SuiteAnalytics Connect Configuration
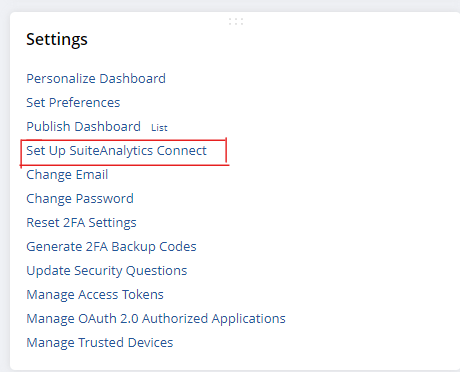
To see information on the SuiteAnalytics Connect service for your environment navigate to
Settings->Set Up SuiteAnalytics Connect

Once here you will see the following information:
- Account ID
- Service Port
- Role ID
It is this information combined with the user's username and password that will allow access to the Kleene Netsuite.com Connector.

Details required to establish Netsuite2.com Data Source connection
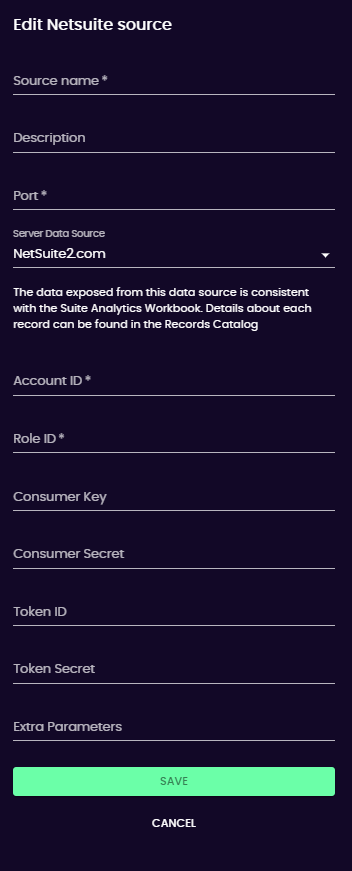
To connect to the netsuite2.com Data Source you will again need to navigate to the SuiteAnalytics Connect service configuration page (Settings->Set Up SuiteAnalytics Connect) and get the following:
- Account ID
- Service Port
- Role ID (Ensure this Role has Token Based Auth enabled, See below for more on TBA)
You will however also need to configure some other settings to get the following:
- Consumer Key
- Consumer Secret
- Token ID
- Token Secret
Follow the next steps in order to get the information above:
To set up TBA in your NetSuite account:
-
Enable the Token-based Authentication Feature. (Docs)
TBA is a compulsory setting to access the Netsuite2.com Data Source -
Set Up Token-based Authentication Roles. (Docs)
The Role used to authenticate must have TBA set as an authentication method, this can be done by creating a new role or modifying an existing one -
Assign Users to Token-based Authentication Roles. ([Docs] (https://docs.oracle.com/en/cloud/saas/netsuite/ns-online-help/bridgehead_4249025340.html))
The User used to authenticate must have a Role with TBA authentication set to true. -
Create Integration Records for Applications to Use TBA ([Docs] (https://docs.oracle.com/en/cloud/saas/netsuite/ns-online-help/bridgehead_4249032125.html))
The system displays the consumer ID and consumer secret only the first time you save the integration record. In cases where an application previously used user credentials as an authentication method, you must reset the consumer ID and consumer secret. Resetting the consumer ID and client secret invalidates the previous consumer ID and client secret. -
Create and Assign Access Token (Docs)
For security reasons, the only time the Token ID and Token Secret values are displayed is on the confirmation page after creation. After you leave this page, these values cannot be retrieved from the system. If you lose or forget these credentials, you will need to create a new token and obtain new values. -
Manage TBA Tokens in the NetSuite UI. (Docs)
You can see your existing TBA Tokens through the Netsuite UI by going to Setup > Users/Roles > User Management > Access Tokens

SuiteAnalytics Connect AuthenticationAfter six failed attempts, the account is locked. You cannot access your account for thirty minutes, at which point you will have one additional attempt. If another failed attempt occurs, the account is locked again for thirty minutes.
You cannot access SuiteAnalytics Connect in the following situations:
- When the Require Password Change on Next Login option is selected on your Employee record’s Access tab.
- If your Employee record is inactive.
- When your role with the SuiteAnalytics Connect permission is inactive. Also, you must ensure that you meet all.
- Connect permission considerations. See Connect Permissions.
- If your password has expired.
Features
| Feature | Support | Notes |
|---|---|---|
| Backfill | ✅ | |
| Incremental | ✅ | |
| Custom backfill | ❌ | |
| API reliability | 🟢 | Reliable |
Connector detail
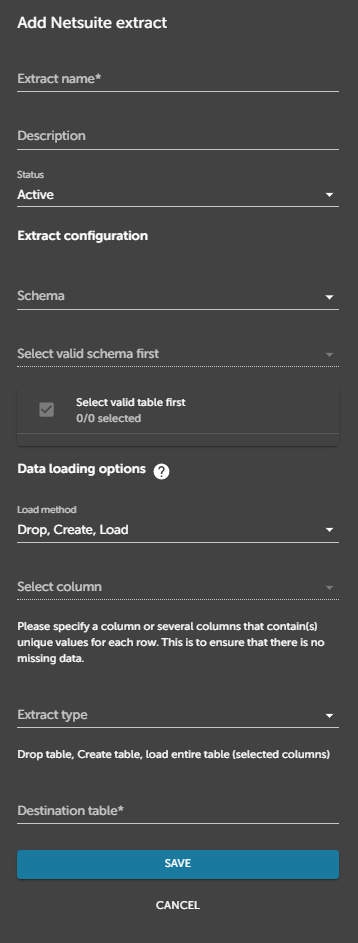
Once you have successfully connected to the Netsuite Connector you will be able to add an extract.

You will be presented with the menu above where a drop down for the schema that you wish to query the tables can be seen.
- Select the relevant schema and the list of tables will be generated.
- Select the table you would like to ingest.
- Specify the columns to ingest.
- Choose a load method - Detail on each can be found here.
- The next drop down specifies the columns with unique values the connector has identified - give this a once over to ensure you are happy with the chosen columns.
- Specify if this is a Full or Incremental Extract
- If you specify Incremental, then you will be asked for an incremental key. See how this works here.
- Give a name to the destination table.
Table Schema Detail
Information on Tables available in the Netsuite Database, their component columns and any primary / foreign keys can be viewed through the link below. This covers the general Schema, any custom lists will also be available through the connector - these lists can be managed and viewed in Netsuite directly.
Updated 3 months ago
